《FlaskWeb开发》阅读笔记
第二部分 Flask实例:社交博客 —— 博客引擎、关注和评论
第二部分 实例:社交博客(下)
博客文章
提交与显示博客
新建文章模型
1
2
3
4
5
6
7
8
9
10
11
# app/models.py:文章模型
class Post(db.Model): # 正文、时间戳、和User的一对多关系
__tablename__ = 'posts'
id = db.Column(db.Integer, primary_key=True)
body = db.Column(db.Text)
timestamp = db.Column(db.DateTime, index=True, default=datetime.utcnow)
author_id = db.Column(db.Integer, db.ForeignKey('users.id'))
class User(UserMixin, db.Model):
# ...
posts = db.relationship('Post', backref='author', lazy='dynamic')增加写文章的表单
1
2
3
4
# app/main/forms.py:博客文章表单
class PostForm(Form):
body = TextAreaField("What's on your mind?", validators=[Required()])
submit = SubmitField('Submit')路由处理表单,并将过去发布的文章列表发给模板
1
2
3
4
5
6
7
8
9
10
11
12
# app/main/views.py:处理博客文章的首页路由
def index():
form = PostForm()
if current_user.can(Permission.WRITE_ARTICLES) and \
form.validate_on_submit(): # 发布新文章前,检查当前用户是否有写文章权限
post = Post(body=form.body.data,
author=current_user._get_current_object())
db.session.add(post)
return redirect(url_for('.index'))
posts = Post.query.order_by(Post.timestamp.desc()).all() # 列表按照时间戳进行降序排列
return render_template('index.html', form=form, posts=posts) # 把表单和完整的博客文章列表传给模板页面显示博客文章的首页( CSS 样式都存储在 static 文件夹里的 style.css)
1
2
3
4
5
6
7
8
9
10
11
12
13
14
15
16
17
18
19
20
21
22
23
24
25
26
27
28
<!--app/templates/index.html:显示博客文章的首页模板-->
{% extends "base.html" %}
{% import "bootstrap/wtf.html" as wtf %}
...
<div>
{% if current_user.can(Permission.WRITE_ARTICLES) %} <!--若角色没有WRITE_ARTICLES权限,则经查后不会显示博客文章表单-->
{{ wtf.quick_form(form) }}
{% endif %}
</div>
<ul class="posts">
{% for post in posts %}
<li class="post">
<div class="profile-thumbnail"> <!--指定了一个 CSS 类以美化页面-->
<a href="{{ url_for('.user', username=post.author.username) }}">
<img class="img-rounded profile-thumbnail"
src="{{ post.author.gravatar(size=40) }}">
</a>
</div>
<div class="post-date">{{ moment(post.timestamp).fromNow() }}</div>
<div class="post-author">
<a href="{{ url_for('.user', username=post.author.username) }}">
{{ post.author.username }}
</a>
</div>
<div class="post-body">{{ post.body }}</div>
</li>
{% endfor %}
</ul>
资料页显示
修改资料页面的路由,获取文章列表
1
2
3
4
5
6
7
8
# app/main/views.py:获取博客文章的资料页路由
def user(username):
user = User.query.filter_by(username=username).first()
if user is None:
abort(404)
posts = user.posts.order_by(Post.timestamp.desc()).all() # 博客文章列表通过User.posts关系获取
return render_template('user.html', user=user, posts=posts)
分页显示列表
创建虚拟的文章数据(
pip install forgerypy,开发环境的依赖)1
2
3
4
5
6
7
8
9
10
11
12
13
14
15
16
17
18
19
20
21
22
23
24
25
26
27
28
29
30
31
32
33
34
35
36
37
38
39
40
41# app/models.py:生成虚拟用户和博客文章
class User(UserMixin, db.Model):
# ...
def generate_fake(count=100):
from sqlalchemy.exc import IntegrityError
from random import seed
import forgery_py # 虚拟对象的属性由ForgeryPy的随机信息生成器生成
seed()
for i in range(count):
u = User(email=forgery_py.internet.email_address(),
username=forgery_py.internet.user_name(True),
password=forgery_py.lorem_ipsum.word(),
confirmed=True,
name=forgery_py.name.full_name(),
location=forgery_py.address.city(),
about_me=forgery_py.lorem_ipsum.sentence(),
member_since=forgery_py.date.date(True))
db.session.add(u)
try: # ForgeryPy随机生成信息,主键有重复的风险
db.session.commit()
except IntegrityError:
db.session.rollback() # 回滚会话,循环中生成重复内容时不会把用户写入数据库
class Post(db.Model):
# ...
def generate_fake(count=100):
from random import seed, randint
import forgery_py
seed()
user_count = User.query.count()
for i in range(count):
u = User.query.offset(randint(0, user_count - 1)).first()
p = Post(body=forgery_py.lorem_ipsum.sentences(randint(1, 3)),
timestamp=forgery_py.date.date(True),
author=u)
db.session.add(p)
db.session.commit()分页显示文章列表
1
2
3
4
5
6
7
8
9
10
11
# app/main/views.py:分页显示博客文章列表
def index():
# ...
page = request.args.get('page', 1, type=int) # 页数从请求的查询字符串(request.args)中获取;参数type=int保证参数无法转换成整数时,返回默认值
pagination = Post.query.order_by(Post.timestamp.desc()).paginate(
page, per_page=current_app.config['FLASKY_POSTS_PER_PAGE'],
error_out=False) # 参数page指明显示某一页的记录;第二个参数指定每页显示的记录数目
posts = pagination.items
return render_template('index.html', form=form, posts=posts,
pagination=pagination)分页导航
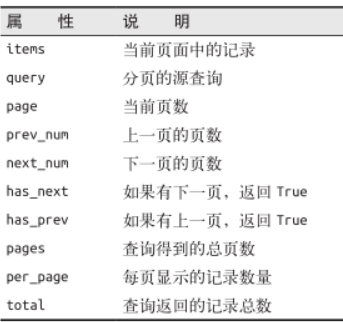
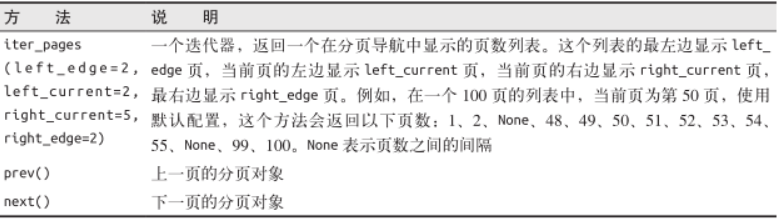
Pagination 类对象包括以下属性和方法,用于生成分页链接。
1
2
3
4
5
6
7
8
9
10
11
12
13
14
15
16
17
18
19
20
21
22
23
24
25
26
27
28
29
30
31
32
<!--app/templates/_macros.html:分页模板宏-->
{% macro pagination_widget(pagination, endpoint) %}
<ul class="pagination">
<li{% if not pagination.has_prev %} class="disabled"{% endif %}>
<a href="{% if pagination.has_prev %}{{ url_for(endpoint,
page = pagination.page - 1, **kwargs) }}{% else %}#{% endif %}">
«
</a>
</li>
{% for p in pagination.iter_pages() %}
{% if p %}
{% if p == pagination.page %}
<li class="active">
<a href="{{ url_for(endpoint, page = p, **kwargs) }}">{{ p }}</a>
</li>
{% else %}
<li>
<a href="{{ url_for(endpoint, page = p, **kwargs) }}">{{ p }}</a>
</li>
{% endif %}
{% else %}
<li class="disabled"><a href="#">…</a></li>
{% endif %}
{% endfor %}
<li{% if not pagination.has_next %} class="disabled"{% endif %}>
<a href="{% if pagination.has_next %}{{ url_for(endpoint,
page = pagination.page + 1, **kwargs) }}{% else %}#{% endif %}">
»
</a>
</li>
</ul>
{% endmacro %}添加分页导航
支持富文本
略
文章链接
每个文章有一个专用的URL引用
1
2
3
4
5
# app/main/views.py:文章的固定链接
def post(id):
post = Post.query.get_or_404(id)
return render_template('post.html', posts=[post])固定链接添加到通用模板中,显示在文章的下方
文章编辑器
博客文章编辑器显示在单独的页面中。页面的上部会显示文章的当前版本,以供参考,之后跟随一个 Markdown 编辑器,用于修改 Markdown 源。编辑器基于 Flask-PageDown 实现,因此页面下部还会显示一个编辑后的文章预览
1
2
3
4
5
6
7
8
9
10
11
12
13
14
15
16
17
18
19
<!--app/templates/edit_post.html:编辑博客文章的模板-->
{% extends "base.html" %}
{% import "bootstrap/wtf.html" as wtf %}
{% block title %}Flasky - Edit Post{% endblock %}
{% block page_content %}
<div class="page-header">
<h1>Edit Post</h1>
</div>
<div>
{{ wtf.quick_form(form) }}
</div>
{% endblock %}
{% block scripts %}
{{ super() }}
{{ pagedown.include_pagedown() }}
{% endblock %}编辑器的路由:只允许博客文章的作者/管理员编辑文章
1
2
3
4
5
6
7
8
9
10
11
12
13
14
15
def edit(id):
post = Post.query.get_or_404(id)
if current_user != post.author and \
not current_user.can(Permission.ADMINISTER):
abort(403)
form = PostForm()
if form.validate_on_submit():
post.body = form.body.data
db.session.add(post)
flash('The post has been updated.')
return redirect(url_for('post', id=post.id))
form.body.data = post.body
return render_template('edit_post.html', form=form)
关注者
数据库的多对多关系
多对多关系
添加关联表,将多对多关系分解成原表和关联表之间的两个一对多关系
关联表就是一个简单的表,不是模型,SQLAlchemy 会自动接管这个表
1
2
3
4
5
6
7
8
9
10
11
12
13
14
15
16
17
# 学生选课为例
registrations = db.Table('registrations',
db.Column('student_id', db.Integer, db.ForeignKey('students.id')),
db.Column('class_id', db.Integer, db.ForeignKey('classes.id'))
)
class Student(db.Model):
id = db.Column(db.Integer, primary_key=True)
name = db.Column(db.String)
classes = db.relationship('Class',
secondary=registrations,
backref=db.backref('students', lazy='dynamic'),
lazy='dynamic') # 把 secondary 参数设为关联表
class Class(db.Model):
id = db.Column(db.Integer, primary_key = True)
name = db.Column(db.String)
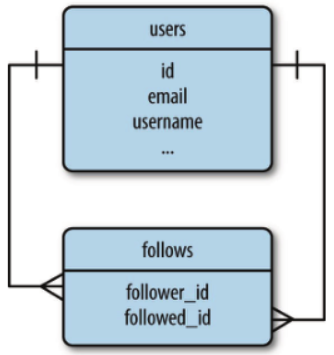
自引用
用户关注其他用户,此时只有用户一个实体——关系表的两侧都在同一个表中
其他处理
将关联表提升为模型
1
2
3
4
5
6
7
8
# app/models/user.py:关注关联表的模型实现
class Follow(db.Model):
__tablename__ = 'follows'
follower_id = db.Column(db.Integer, db.ForeignKey('users.id'),
primary_key=True)
followed_id = db.Column(db.Integer, db.ForeignKey('users.id'),
primary_key=True)
timestamp = db.Column(db.DateTime, default=datetime.utcnow)定义关系
1
2
3
4
5
6
7
8
9
10
11
12
13
# app/models/user.py:使用两个一对多关系实现的多对多关系
class User(UserMixin, db.Model):
# ...
followed = db.relationship('Follow',
foreign_keys=[Follow.follower_id],
backref=db.backref('follower', lazy='joined'),
lazy='dynamic',
cascade='all, delete-orphan')
followers = db.relationship('Follow',
foreign_keys=[Follow.followed_id],
backref=db.backref('followed', lazy='joined'),
lazy='dynamic',
cascade='all, delete-orphan')相关操作的函数
1
2
3
4
5
6
7
8
9
10
11
12
13
14
15
16
17
18
19
class User(db.Model):
# ...
def follow(self, user):
if not self.is_following(user):
f = Follow(follower=self, followed=user)
db.session.add(f)
def unfollow(self, user):
f = self.followed.filter_by(followed_id=user.id).first()
if f:
db.session.delete(f)
def is_following(self, user):
return self.followed.filter_by(
followed_id=user.id).first() is not None
def is_followed_by(self, user):
return self.followers.filter_by(
follower_id=user.id).first() is not None
资料页中显示关注
资料页(
app/templates/user.html)添加关注信息设置关注路由(点击按钮后进入新的页面)
1
2
3
4
5
6
7
8
9
10
11
12
13
14
15
16
# app/main/views.py: “关注”路由和视图函数
def follow(username):
user = User.query.filter_by(username=username).first()
# 确保用户存在且当前登录用户还没有关注这个用户
if user is None:
flash('Invalid user.')
return redirect(url_for('.index'))
if current_user.is_following(user):
flash('You are already following this user.')
return redirect(url_for('.user', username=username))
current_user.follow(user)
flash('You are now following %s.' % username)
return redirect(url_for('.user', username=username))在其他用户的资料页中点击关注者数量后调用
1
2
3
4
5
6
7
8
9
10
11
12
13
14
15
16
def followers(username):
user = User.query.filter_by(username=username).first()
if user is None: # 加载并验证请求的用户
flash('Invalid user.')
return redirect(url_for('.index'))
# 分页显示该用户的followers关系
page = request.args.get('page', 1, type=int)
pagination = user.followers.paginate(
page, per_page=current_app.config['FLASKY_FOLLOWERS_PER_PAGE'],
error_out=False)
follows = [{'user': item.follower, 'timestamp': item.timestamp}
for item in pagination.items]
return render_template('followers.html', user=user, title="Followers of",
endpoint='.followers', pagination=pagination,
follows=follows)
数据库联结查询
联结操作用到两个或更多的数据表,在其中查找满足指定条件的记录组合,再把记录组合插入一个临时表中,这个临时表就是联结查询的结果
1
2
3
return db.session.query(Post).select_from(Follow).\
filter_by(follower_id=self.id).\
join(Post, Follow.followed_id == Post.author_id)获取所关注用户的文章
1
2
3
4
5
6
class User(db.Model):
# ...
def followed_posts(self):
return Post.query.join(Follow, Follow.followed_id == Post.author_id)\
.filter(Follow.follower_id == self.id)
首页显示关注用户文章
显示所有博客文章/显示只关注用户的文章,其选项存储在 cookie 的 show_followed 字段
cookie 以 request.cookies 字典的形式存储在请求对象
1
2
3
4
5
6
7
8
9
10
11
12
13
14
# app/main/views.py:查询所有文章还是所关注用户的文章
def show_all():
resp = make_response(redirect(url_for('.index')))
resp.set_cookie('show_followed', '', max_age=30*24*60*60)
return resp
def show_followed():
resp = make_response(redirect(url_for('.index')))
resp.set_cookie('show_followed', '1', max_age=30*24*60*60)
return resp
用户评论
数据库中的表示
评论和博客文章的差别不大
1
2
3
4
5
6
7
8
9
10
11
12
13
14
15
16
17
18
19
20
21
22
23
24
25
26
27
28
29
# app/models.py:Comment 模型
class Comment(db.Model):
__tablename__ = 'comments'
id = db.Column(db.Integer, primary_key=True)
body = db.Column(db.Text)
body_html = db.Column(db.Text)
timestamp = db.Column(db.DateTime, index=True, default=datetime.utcnow)
disabled = db.Column(db.Boolean) # 协管员通过这个字段查禁不当评论
author_id = db.Column(db.Integer, db.ForeignKey('users.id'))
post_id = db.Column(db.Integer, db.ForeignKey('posts.id'))
def on_changed_body(target, value, oldvalue, initiator):
allowed_tags = ['a', 'abbr', 'acronym', 'b', 'code', 'em', 'i',
'strong']
target.body_html = bleach.linkify(bleach.clean(
markdown(value, output_format='html'),
tags=allowed_tags, strip=True))
db.event.listen(Comment.body, 'set', Comment.on_changed_body)
# users 和 posts 表与 comments 表之间的一对多关系
class User(db.Model):
# ...
comments = db.relationship('Comment', backref='author', lazy='dynamic')
class Post(db.Model):
# ...
comments = db.relationship('Comment', backref='post', lazy='dynamic')
提交和显示
输入评论的表单——只有一个文本字段和一个提交按钮
1
2
3
4
# app/main/forms.py:评论输入表单
class CommentForm(Form):
body = StringField('', validators=[Required()])
submit = SubmitField('Submit')支持评论的博客路由
1
2
3
4
5
6
7
8
9
10
11
12
13
14
15
16
17
18
19
20
21
22
# app/main/views.py:支持博客文章评论
def post(id):
post = Post.query.get_or_404(id)
form = CommentForm() # 实例化一个评论表单,并加入post.html模板
if form.validate_on_submit():
comment = Comment(body=form.body.data,
post=post,
author=current_user._get_current_object())
db.session.add(comment)
flash('Your comment has been published.')
return redirect(url_for('.post', id=post.id, page=-1))
page = request.args.get('page', 1, type=int)
if page == -1: # 从查询字符串中获取页数,发现值为 -1 时,会计算评论的总量和总页数
page = (post.comments.count() - 1) / \
current_app.config['FLASKY_COMMENTS_PER_PAGE'] + 1 # FLASKY_COMMENTS_PER_PAGE 配置变量在 config.py
pagination = post.comments.order_by(Comment.timestamp.asc()).paginate(
page, per_page=current_app.config['FLASKY_COMMENTS_PER_PAGE'],
error_out=False) # 评论按照时间戳顺序排列,新评论显示在列表的底部
comments = pagination.items
return render_template('post.html', posts=[post], form=form,
comments=comments, pagination=pagination) # 评论列表对象和分页对象都传入了模板首页和资料页增加指向评论页面的链接
1
2
3
4
5
6
<!--app/templates/_posts.html:链接到博客文章的评论-->
<a href="{{ url_for('.post', id=post.id) }}#comments">
<span class="label label-primary">
{{ post.comments.count() }} Comments
</span>
</a>
评论管理
与用户角色有关
导航条增加一个链接,只有具有权限的用户能够看到
1
2
3
4
5
6
<!--app/templates/base.html:在导航条中加入管理评论链接-->
...
{% if current_user.can(Permission.MODERATE_COMMENTS) %}
<li><a href="{{ url_for('main.moderate') }}">Moderate Comments</a></li>
{% endif %}
...管理评论的路由
1
2
3
4
5
6
7
8
9
10
11
12
# app/main/views.py:管理评论的路由
def moderate():
page = request.args.get('page', 1, type=int)
pagination = Comment.query.order_by(Comment.timestamp.desc()).paginate(
page, per_page=current_app.config['FLASKY_COMMENTS_PER_PAGE'],
error_out=False) # 同一个列表中显示全部文章的评论
comments = pagination.items
return render_template('moderate.html', comments=comments,
pagination=pagination, page=page) # 读取一页评论,将其和分页对象、当前页数传入模板进行渲染管理模板依靠之前创建的子模板 _comments.html 渲染评论
1
2
3
4
5
6
7
8
9
10
11
12
13
14
15
16
17
18
<!--app/templates/moderate.html:评论管理页面的模板-->
{% extends "base.html" %}
{% import "_macros.html" as macros %}
{% block title %}Flasky - Comment Moderation{% endblock %}
{% block page_content %}
<div class="page-header">
<h1>Comment Moderation</h1>
</div>
{% set moderate = True %} <!--定义一个模板变量 moderate,用在 _comments.html 模板中,决定是否渲染评论管理功能-->
{% include '_comments.html' %}
{% if pagination %}
<div class="pagination">
{{ macros.pagination_widget(pagination, '.moderate') }}
</div>
{% endif %}
{% endblock %}评论管理路由(在每篇评论的下方,协管员还能看到一个按钮,用来切换评论的状态):启用路由和禁用路由先加载评论对象,把 disabled 字段设为正确的值,再把评论对象写入数据库
1
2
3
4
5
6
7
8
9
10
11
12
13
14
15
16
17
18
19
20
# app/main/views.py:评论管理路由
def moderate_enable(id):
comment = Comment.query.get_or_404(id)
comment.disabled = False
db.session.add(comment)
return redirect(url_for('.moderate',
page=request.args.get('page', 1, type=int)))
def moderate_disable(id):
comment = Comment.query.get_or_404(id)
comment.disabled = True
db.session.add(comment)
return redirect(url_for('.moderate',
page=request.args.get('page', 1, type=int)))
应用编程接口
业务逻辑移到客户端
略
第三部分 测试与部署
测试
代码覆盖报告
pip install coverage1
2
3
4
5
6
7
8
9
10
11
12
13
14
15
16
17
18
19
20
21
22
23
24
25
26
27
28
29
30
31
32
33#!/usr/bin/env python
import os
COV = None
if os.environ.get('FLASK_COVERAGE'):
import coverage
COV = coverage.coverage(branch=True, include='app/*') # 启动覆盖检测引擎;include 选项用来限制程序包中文件的分析范围
COV.start()
# ...
def test(coverage=False):
"""Run the unit tests."""
if coverage and not os.environ.get('FLASK_COVERAGE'):
import sys
os.environ['FLASK_COVERAGE'] = '1'
# 设定完环境变量 FLASK_COVERAGE 后,脚本会重启
os.execvp(sys.executable, [sys.executable] + sys.argv)
import unittest
tests = unittest.TestLoader().discover('tests')
unittest.TextTestRunner(verbosity=2).run(tests)
if COV:
COV.stop()
COV.save()
print('Coverage Summary:')
COV.report()
basedir = os.path.abspath(os.path.dirname(__file__))
covdir = os.path.join(basedir, 'tmp/coverage')
COV.html_report(directory=covdir)
print('HTML version: file://%s/index.html' % covdir)
COV.erase()
# ...1
$ python manage.py test --coverage
测试客户端
测试 Web 程序
1
2
3
4
5
6
7
8
9
10
11
12
13
14
15
16
17
18
19
20
21
22# tests/test_client.py:使用 Flask 测试客户端编写的测试框架
import unittest
from app import create_app, db
from app.models import User, Role
class FlaskClientTestCase(unittest.TestCase):
def setUp(self):
self.app = create_app('testing')
self.app_context = self.app.app_context()
self.app_context.push()
db.create_all()
Role.insert_roles()
self.client = self.app.test_client(use_cookies=True) # Flask 测试客户端对象
def tearDown(self):
db.session.remove()
db.drop_all()
self.app_context.pop()
def test_home_page(self): # 客户端向首页发起了一个请求
response = self.client.get(url_for('main.index'))
self.assertTrue('Stranger' in response.get_data(as_text=True)) # 在响应主体中搜索是否包含 "Stranger" 这个词测试中应当禁用 CSRF 保护功能,以便测试客户端使用 post() 方法
1
2
3
4# config.py:在测试配置中禁用 CSRF 保护
class TestingConfig(Config):
#...
WTF_CSRF_ENABLED = False模拟注册、登录、确认账户和退出
1
2
3
4
5
6
7
8
9
10
11
12
13
14
15
16
17
18
19
20
21
22
23
24
25
26
27
28
29
30
31
32
33
34
35# tests/test_client.py:使用 Flask 测试客户端模拟新用户注册的整个流程
class FlaskClientTestCase(unittest.TestCase):
# ...
def test_register_and_login(self):
# 注册新账户
response = self.client.post(url_for('auth.register'), data={
'email': 'john@example.com',
'username': 'john',
'password': 'cat',
'password2': 'cat'
})
self.assertTrue(response.status_code == 302)
# 使用新注册的账户登录
response = self.client.post(url_for('auth.login'), data={
'email': 'john@example.com',
'password': 'cat'
}, follow_redirects=True)
data = response.get_data(as_text=True)
self.assertTrue(re.search('Hello,\s+john!', data))
self.assertTrue('You have not confirmed your account yet' in data)
# 发送确认令牌
user = User.query.filter_by(email='john@example.com').first()
token = user.generate_confirmation_token()
response = self.client.get(url_for('auth.confirm', token=token),
follow_redirects=True)
data = response.get_data(as_text=True)
self.assertTrue('You have confirmed your account' in data)
# 退出
response = self.client.get(url_for('auth.logout'),
follow_redirects=True)
data = response.get_data(as_text=True)
self.assertTrue('You have been logged out' in data)
测试 Web 服务(需要先配置 REST Web)
端到端测试
- 需要一个完整的环境,使用真正的 Web 浏览器连接 Web 服务器中运行的程序
pip install selenium
性能
记录影响性能的缓慢数据库查询——把慢于设定阈值的查询写入日志
1
2
3
4
5
6
7
8
9
10
11
12# app/main/views.py:报告缓慢的数据库查询
from flask.ext.sqlalchemy import get_debug_queries
def after_request(response):
for query in get_debug_queries(): # get_debug_queries() 函数返回一个列表,其元素是请求中执行的查询
if query.duration >= current_app.config['FLASKY_SLOW_DB_QUERY_TIME']: # 遍历 get_debug_queries() 函数获取的列表,把持续时间比设定阈值长的查询写入日志
current_app.logger.warning(
'Slow query: %s\nParameters: %s\nDuration: %fs\nContext: %s\n' %
(query.statement, query.parameters, query.duration,
query.context))
return response启用缓慢查询记录配置
1
2
3
4
5
6
# config.py:启用缓慢查询记录功能的配置
class Config:
# ...
SQLALCHEMY_RECORD_QUERIES = True
FLASKY_DB_QUERY_TIMEOUT = 0.5
# ...
部署
安装到服务器上。略