《Hands-on Machine Learning》第二部分阅读笔记(2)用 tf 自定义模型训练网络
Custom Models and Training with TensorFlow
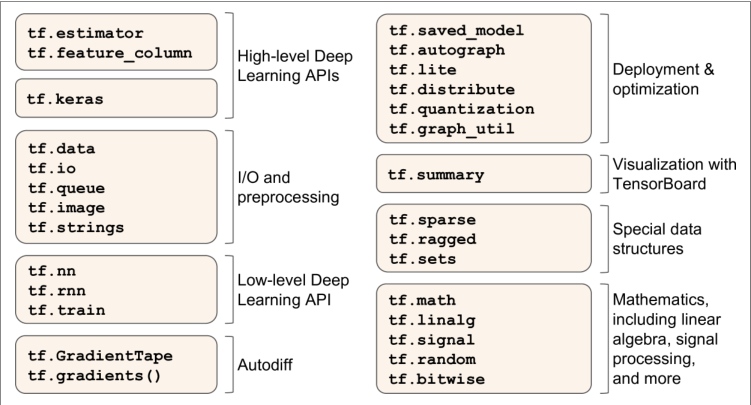
概览
核心类似 Numpy
支持分布式与 GPU 计算
从 Python 函数中提取计算图,并优化
计算图可以导出为可移植格式
提供了一些优化器
数据加载(tf.data)、预处理(tf.io)、图像处理(tf.image)、信号处理(tf.signal)
每个张量流操作都是使用 C++ 实现
许多操作有多个实现(内核),每个内核专用于特定的设备类型
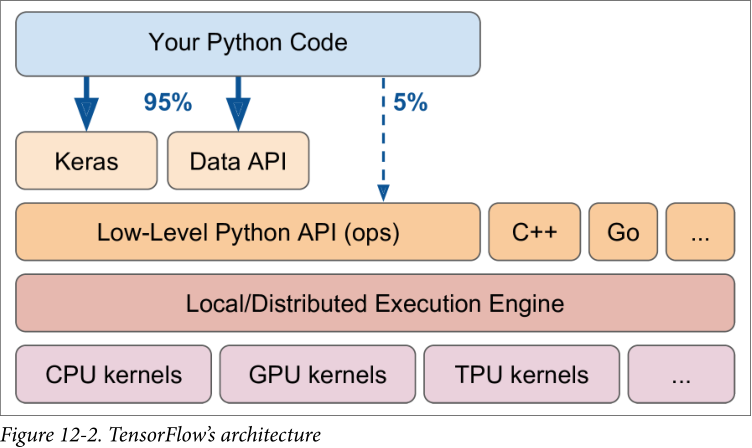
TensorFlow Lite——移动端;TensorFlow.js——浏览器运行;TensorFlow Hub——下载和重用预训练神经网络
Using TensorFlow like NumPy
张量与操作
tf.constant()根据输入矩阵创建张量,有属性 shape 和 dtype- 张量索引类似 Numpy
- 张量运算:
tf.add()、tf.multiply()、tf.square()、tf.exp()、tf.sqrt()等。很多命名类似于 Numpy,但也有部分不同
张量和Numpy
可以从 NumPy 数组创建张量,反之亦然
1
2a = np.array([2., 4., 5.])
tf.constant(a)可以对 NumPy 数组应用张量流操作,对张量应用 NumPy 操作
默认情况下,NumPy 使用64位精度,而张量流使用32位精度,因此转换的时候设置
dtype = tf.float32
类型转换
TensorFlow 不会自动执行任何类型转换,因为类型转换会严重影响性能
不能使浮点张量和整数张量相加,甚至不能使32位浮点和64位浮点相加
tf.cast()转换数据类型1
tf.constant(2.0) + tf.cast(t2, tf.float32)
变量
上面是张量常量
张量变量:
1
v = tf.Variable([[1., 2., 3.], [4., 5., 6.]])
可以用张量变量执行相同的操作,同 Numpy 共同使用
其他的变量方法:
1
2
3
4
5v.assign(2 * v) # => [[2., 4., 6.], [8., 10., 12.]]
v[0, 1].assign(42) # => [[2., 42., 6.], [8., 10., 12.]]
v[:, 2].assign([0., 1.]) # => [[2., 42., 0.], [8., 10., 1.]]
v.scatter_nd_update(indices=[[0, 0], [1, 2]], updates=[100., 200.])
# => [[100., 42., 0.], [8., 10., 200.]]
其他数据结构
- Sparse tensors(tf.SparseTensor):表示大部分为 0 的张量,tf.sparse 包有稀疏张量的运算
- Tensor arrays(tf.TensorArray):张量列表,默认情况下大小固定,包含的所有张量必须具有相同的形状和数据类型
- Ragged tensors(tf.RaggedTensor):张量列表的静态列表,每个张量具有相同的形状和数据类型。包 tf.ragged 包含了其运算
- String tensors(tf.string):张量实际上表示的是字节字符串,将被自动编码为 UTF-8;可以使用 tf.int32 类型的张量表示 Unicode 字符串;包 tf.strings 包含字节字符串和 Unicode 字符串的操作
- Sets
- Queues:包括先进先出队列、优先级队列、随机无序队列、填充无序队列
定制模型和训练算法
自定义损失函数
训练一个回归模型,但数据噪音大,自定义 huber 损失(API 中没有)
1
2
3
4
5
6
def huber_fn(y_true, y_pred):
error = y_true - y_pred
is_small_error = tf.abs(error) < 1
squared_loss = tf.square(error) / 2
linear_loss = tf.abs(error) - 0.5
return tf.where(is_small_error, squared_loss, linear_loss)- 使用矢量化实现
- 只使用 TensorFlow 操作
编译
1
2model.compile(loss=huber_fn, optimizer="nadam")
model.fit(X_train, y_train, [...])
保存和加载包含自定义组件的模型
加载模型时需要提供一个将函数名映射到实际函数的字典——Keras只是保存了函数的名称
1
2
model = keras.models.load_model("my_model_with_a_custom_loss.h5",
custom_objects={"huber_fn": huber_fn})改良:创建一个配置损失函数的函数
1
2
3
4
5
6
7
8
9
def create_huber(threshold=1.0):
def huber_fn(y_true, y_pred):
error = y_true - y_pred
is_small_error = tf.abs(error) < threshold
squared_loss = tf.square(error) / 2
linear_loss = threshold * tf.abs(error) - threshold**2 / 2
return tf.where(is_small_error, squared_loss, linear_loss)
return huber_fn
model.compile(loss=create_huber(2.0), optimizer="nadam")保存模型时,阈值将不会被保存,因此加载模型时指定阈值
注意,要使用的名称是“huber_fn”,是传给 Keras 的函数名,而不是创建它的函数名
1
2
model = keras.models.load_model("my_model_with_a_custom_loss_threshold_2.h5",
custom_objects={"huber_fn": create_huber(2.0)})
改良:创建 keras.losses.Loss 的子类,并执行
get_config()方法1
2
3
4
5
6
7
8
9
10
11
12
13class HuberLoss(keras.losses.Loss):
def __init__(self, threshold=1.0, **kwargs):
self.threshold = threshold
super().__init__(**kwargs)
def call(self, y_true, y_pred):
error = y_true - y_pred
is_small_error = tf.abs(error) < self.threshold
squared_loss = tf.square(error) / 2
linear_loss = self.threshold * tf.abs(error) - self.threshold**2 / 2
return tf.where(is_small_error, squared_loss, linear_loss)
def get_config(self):
base_config = super().get_config()
return {**base_config, "threshold": self.threshold}构造函数接收 **kwargs,父构造函数处理标准超参数
call()接收标签和预测,计算所有实例损失get_config()返回字典,将每个超参数名称映射到其值,先调用父类的get_config(),再将新的超参数添加到该字典中保存模型时,阈值将与它一起保存,只需要将类名映射到类本身
1
2model = keras.models.load_model("my_model_with_a_custom_loss_class.h5",
custom_objects={"HuberLoss": HuberLoss})保存模型时,Keras 调用实例的
get_config(),将配置保存为 HDF5 文件中的 JSON。加载模型,调用 HuberLoss 类的from_config()(由基类 Loss 实现)
自定义激活函数、初始化、正则化和约束
1 | def my_softplus(z): # return value is just tf.nn.softplus(z) |
如果一个函数有一些超参数需要和模型一起保存,那么就需要子类化合适的类(keras.regularizers.Regularizer、keras.constraints.Constraint、keras.initializers.Initializer、keras.layers.Layer)
1
2
3
4
5
6
7class MyL1Regularizer(keras.regularizers.Regularizer):
def __init__(self, factor):
self.factor = factor
def __call__(self, weights):
return tf.reduce_sum(tf.abs(self.factor * weights))
def get_config(self):
return {"factor": self.factor}必须为损失、层(包括激活函数)和模型实现
call()为正则化、初始化和约束实现
__call__()
自定义指标
指标可以是不可微的或者在任何地方都具有 0 梯度(如,准确率)
在大多数情况下,定义自定义度量函数与定义自定义损失函数完全相同
1
model.compile(loss="mse", optimizer="nadam", metrics=[create_huber(2.0)])
自定义 Huber 指标
1
2
3
4
5
6
7
8
9
10
11
12
13
14
15
16class HuberMetric(keras.metrics.Metric):
def __init__(self, threshold=1.0, **kwargs):
super().__init__(**kwargs) # handles base args (e.g., dtype)
self.threshold = threshold
self.huber_fn = create_huber(threshold)
self.total = self.add_weight("total", initializer="zeros")
self.count = self.add_weight("count", initializer="zeros")
def update_state(self, y_true, y_pred, sample_weight=None):
metric = self.huber_fn(y_true, y_pred)
self.total.assign_add(tf.reduce_sum(metric))
self.count.assign_add(tf.cast(tf.size(y_true), tf.float32))
def result(self):
return self.total / self.count
def get_config(self):
base_config = super().get_config()
return {**base_config, "threshold": self.threshold}add_weight()创建跟踪多个批次的指标状态所需的变量update_state()更新一批给定的标签和预测的变量result()计算并返回最终结果,本例中是所有实例的平均 Huber 度量get_config()确保阈值与模型一起保存reset_states()默认执行,将所有变量重置为0.0
有些指标,比如精度,不能简单地按批次平均——只能实现 streaming metric
自定义层
有些层没有权重,因此如果自定义一个没有权重的层,最简单的方法是用 keras.layers.Lambda 层包装自定义的函数
1
2# 对输入应用指数函数
exponential_layer = keras.layers.Lambda(lambda x: tf.exp(x))创建一个有参数的层
1
2
3
4
5
6
7
8
9
10
11
12
13
14
15
16
17
18
19
20class MyDense(keras.layers.Layer):
def __init__(self, units, activation=None, **kwargs):
super().__init__(**kwargs)
self.units = units
self.activation = keras.activations.get(activation)
def build(self, batch_input_shape):
self.kernel = self.add_weight(
name="kernel", shape=[batch_input_shape[-1], self.units],
initializer="glorot_normal")
self.bias = self.add_weight(
name="bias", shape=[self.units], initializer="zeros")
super().build(batch_input_shape) # must be at the end
def call(self, X):
return self.activation(X @ self.kernel + self.bias)
def compute_output_shape(self, batch_input_shape):
return tf.TensorShape(batch_input_shape.as_list()[:-1] + [self.units])
def get_config(self):
base_config = super().get_config()
return {**base_config, "units": self.units,
"activation": keras.activations.serialize(self.activation)}- 构造函数将所有的超参数作为参数;调用父构造函数传入
**kwargs(处理标准参数,如input_shape、trainable、name) - 将超参数保存为属性,
keras.activations.get()将激活参数转换为适当的激活函数 build():调用add_weight()创建层的变量,Keras 将知道该层输入的形状;末尾必须调用父类的build()告知 Keras 层已经构建好call()实际执行所需的操作compute_output_shape()简单地返回该层输出的形状;在 tf.keras 中,shape 是 tf.TensorShape 类的实例,因此可以用as_list()转化为 Python 的列表get_config()
- 构造函数将所有的超参数作为参数;调用父构造函数传入
接收多个输入返回多个输出:
1
2
3
4
5
6
7
class MyMultiLayer(keras.layers.Layer):
def call(self, X):
X1, X2 = X
return [X1 + X2, X1 * X2, X1 / X2]
def compute_output_shape(self, batch_input_shape):
b1, b2 = batch_input_shape
return [b1, b1, b1] # should probably handle broadcasting rulescall()的参数应该是包含所有输入的元组compute_output_shape()参数应该是包含每个输入的批处理形状的元组
层在训练和测试期间需要有不同的行为(如 Dropout)
1
2
3
4
5
6
7
8
9
10
11
12class MyGaussianNoise(keras.layers.Layer):
def __init__(self, stddev, **kwargs):
super().__init__(**kwargs)
self.stddev = stddev
def call(self, X, training=None):
if training:
noise = tf.random.normal(tf.shape(X), stddev=self.stddev)
return X + noise
else:
return X
def compute_output_shape(self, batch_input_shape):
return batch_input_shape- 必须向
call()添加一个训练参数,并使用该参数来决定要做什么
- 必须向
自定义模型
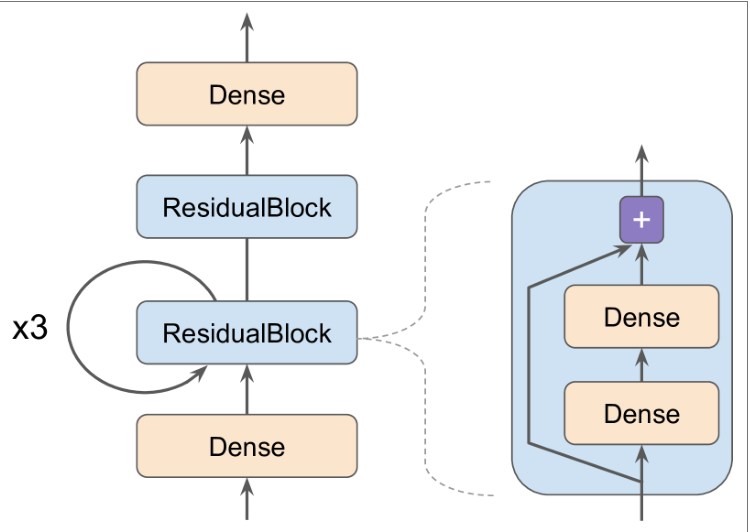
创建 Residual Block
1
2
3
4
5
6
7
8
9
10
11class ResidualBlock(keras.layers.Layer):
def __init__(self, n_layers, n_neurons, **kwargs):
super().__init__(**kwargs)
self.hidden = [keras.layers.Dense(n_neurons, activation="elu",
kernel_initializer="he_normal")
for _ in range(n_layers)]
def call(self, inputs):
Z = inputs
for layer in self.hidden:
Z = layer(Z)
return inputs + Z- Keras 自动检测到 hidden 属性包含的可跟踪对象
模型定义
1
2
3
4
5
6
7
8
9
10
11
12
13
14class ResidualRegressor(keras.models.Model):
def __init__(self, output_dim, **kwargs):
super().__init__(**kwargs)
self.hidden1 = keras.layers.Dense(30, activation="elu",
kernel_initializer="he_normal")
self.block1 = ResidualBlock(2, 30)
self.block2 = ResidualBlock(2, 30)
self.out = keras.layers.Dense(output_dim)
def call(self, inputs):
Z = self.hidden1(inputs)
for _ in range(1 + 3):
Z = self.block1(Z)
Z = self.block2(Z)
return self.out(Z)模型类实际上是层类的子类,一个模型也有一些额外的功能,如
compile(),fit(),evaluate()和predict()
基于模型内部的损失和指标
之前定义的自定义损失和指标都是基于标签和预测
要定义基于模型内部的自定义损失,只需计算想要的模型的任何部分,然后将结果传递给
add_loss()举例:标准的 MLP 回归,5个隐藏层,最后一个隐藏层的上面增加了一个额外的密集层用于重建模型的输入
1
2
3
4
5
6
7
8
9
10
11
12
13
14
15
16
17
18
19class ReconstructingRegressor(keras.models.Model):
def __init__(self, output_dim, **kwargs):
super().__init__(**kwargs)
self.hidden = [keras.layers.Dense(30, activation="selu",
kernel_initializer="lecun_normal")
for _ in range(5)]
self.out = keras.layers.Dense(output_dim)
def build(self, batch_input_shape):
n_inputs = batch_input_shape[-1]
self.reconstruct = keras.layers.Dense(n_inputs)
super().build(batch_input_shape)
def call(self, inputs):
Z = inputs
for layer in self.hidden:
Z = layer(Z)
reconstruction = self.reconstruct(Z)
recon_loss = tf.reduce_mean(tf.square(reconstruction - inputs))
self.add_loss(0.05 * recon_loss)
return self.out(Z)- 计算重建和输入之间的均方差,调用
add_loss()将该值(乘以0.05)添加到模型的损失列表中,Keras 会将这一损失加入到主要损失
- 计算重建和输入之间的均方差,调用
Computing Gradients Using Autodiff
tf.GradientTape()自动记录涉及变量的每个操作1
2
3
4w1, w2 = tf.Variable(5.), tf.Variable(3.)
with tf.GradientTape() as tape:
z = f(w1, w2)
gradients = tape.gradient(z, [w1, w2])调用
tape.gradient()后,tape 会被回收,因此如果两次调用,则会报错——设置persistent=True1
2
3
4
5with tf.GradientTape(persistent=True) as tape:
z = f(w1, w2)
dz_dw1 = tape.gradient(z, w1) # => tensor 36.0
dz_dw2 = tape.gradient(z, w2) # => tensor 10.0, works fine now!
del tapetape 默认只跟踪涉及变量的操作,但可以强迫 tape 跟踪任何张量,记录每一个涉及它们的操作
1
2
3
4
5with tf.GradientTape() as tape:
tape.watch(c1)
tape.watch(c2)
z = f(c1, c2)
gradients = tape.gradient(z, [c1, c2])计算二阶导数
1
2
3
4
5
6
7with tf.GradientTape(persistent=True) as hessian_tape:
with tf.GradientTape() as jacobian_tape:
z = f(w1, w2)
jacobians = jacobian_tape.gradient(z, [w1, w2])
hessians = [hessian_tape.gradient(jacobian, [w1, w2])
for jacobian in jacobians]
del hessian_tape阻止某些网络部分反向传播
1
2
3
4
5def f(w1, w2):
return 3 * w1 ** 2 + tf.stop_gradient(2 * w1 * w2)
with tf.GradientTape() as tape:
z = f(w1, w2) # same result as without stop_gradient()
gradients = tape.gradient(z, [w1, w2]) # => returns [tensor 30., None]
自定义训练循环
fit()可能不够灵活——只使用一个优化器模型建立
1
2
3
4
5
6l2_reg = keras.regularizers.l2(0.05)
model = keras.models.Sequential([
keras.layers.Dense(30, activation="elu", kernel_initializer="he_normal",
kernel_regularizer=l2_reg),
keras.layers.Dense(1, kernel_regularizer=l2_reg)
])batch 处理
1
2
3def random_batch(X, y, batch_size=32):
idx = np.random.randint(len(X), size=batch_size)
return X[idx], y[idx]状态打印
1
2
3
4
5
6def print_status_bar(iteration, total, loss, metrics=None):
metrics = " - ".join(["{}: {:.4f}".format(m.name, m.result())
for m in [loss] + (metrics or [])])
end = "" if iteration < total else "\n"
print("\r{}/{} - ".format(iteration, total) + metrics,
end=end)超参数设置
1
2
3
4
5
6
7n_epochs = 5
batch_size = 32
n_steps = len(X_train) // batch_size
optimizer = keras.optimizers.Nadam(lr=0.01)
loss_fn = keras.losses.mean_squared_error
mean_loss = keras.metrics.Mean()
metrics = [keras.metrics.MeanAbsoluteError()]自定义循环
1
2
3
4
5
6
7
8
9
10
11
12
13
14
15
16
17for epoch in range(1, n_epochs + 1):
print("Epoch {}/{}".format(epoch, n_epochs))
for step in range(1, n_steps + 1):
X_batch, y_batch = random_batch(X_train_scaled, y_train)
with tf.GradientTape() as tape:
y_pred = model(X_batch, training=True)
main_loss = tf.reduce_mean(loss_fn(y_batch, y_pred))
loss = tf.add_n([main_loss] + model.losses)
gradients = tape.gradient(loss, model.trainable_variables)
optimizer.apply_gradients(zip(gradients, model.trainable_variables))
mean_loss(loss)
for metric in metrics:
metric(y_batch, y_pred)
print_status_bar(step * batch_size, len(y_train), mean_loss, metrics)
print_status_bar(len(y_train), len(y_train), mean_loss, metrics)
for metric in [mean_loss] + metrics:
metric.reset_states()
TensorFlow 函数和图
举例:
1
2
3
4def cube(x):
return x ** 3
# 将Python函数转为TF 函数
tf_cube = tf.function(cube)tf.function()分析cube()执行的计算并生成一个等效的计算图通常使用
tf.function作为装饰器1
2
3
def tf_cube(x):
return x ** 3仍可通过属性
python_function获得原始的 Python 函数1
2tf_cube.python_function(2)
8
TF 优化计算图,修剪未使用的节点,简化表达式,一个 TF 函数通常会比最初的 Python 函数运行得快
编写自定义损失函数、自定义度量、自定义图层或任何其他自定义函数,并在 Keras 模型中使用时,Keras 会自动将函数转换为 TF 函数,无需使用
tf.function()
Autograph and Tracing
分析 Python 函数的源代码,捕获所有的控制流语句,例如 for 循环和 while 循环、if 语句以及 break、continue 和 return 语句——Autograph
分析了函数的代码之后,输出该函数的升级版本,控制流语句都被适当的 TensorFlow 操作所替换
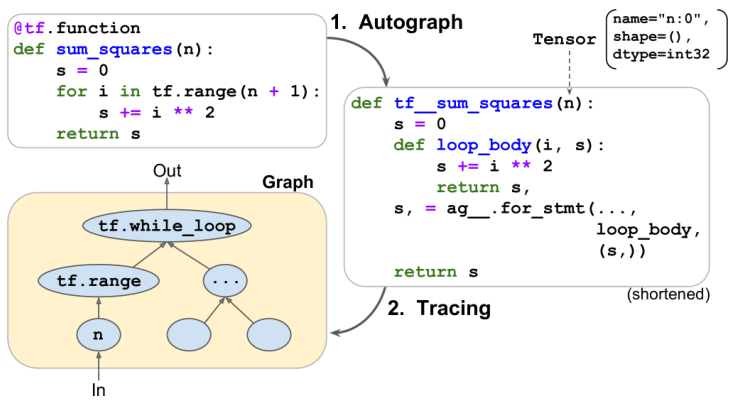
TF 调用这个“升级的”函数,但是没有传递实际的参数,而是传递了一个符号张量(只有一个名称、一个数据类型和一个形状)——每个 TF 操作将在图形中添加一个节点来表示它自己和它的输出张量,此时称为紧急执行或紧急模式(eager mode)
TF 函数规则
把一个执行 TensorFlow 操作的 Python 函数转换成 TF 函数代价很小
TF 图只能包含 TF 构造,NumPy 甚至标准库不属于图的一部分——一定要用
tf.reduce_sum()代替np.sum(),以此类推通常最好在 TF 函数之外创建变量
TF 只捕获迭代张量或数据集的循环,因此必须是
for i in tf.range(10)尽可能地选择矢量化实现,而不是使用循环