Spring——控制反转、面向切面编程,整合MyBatis
概述
Spring 是分层的 JavaSE/EE 应用轻量级开源框架,以 IoC(Inverse Of Control:控制反转)和 AOP(Aspect Oriented Programming:面向切面编程)为内核,提供了view层 Spring MVC、持久层 Spring JDBC 等技术
POJO、PO、DTO、DAO、BO、VO:
POJO:Plain Ordinary Java Object,即简单普通的java对象,没有从任何类继承、也没有实现任何接口,更没有被其它框架侵入的java对象。一般用在数据层映射到数据库表的类
PO:Persistant Object,即持久化对象。可以理解为数据库中的一条数据即一个PO对象,或者为POJO经过持久化后的对象
DTO:Data Transfer Object,即数据传输对象。一般用于向数据层外围提供仅需的数据,例如一个表有50个字段,界面或服务只需要其中某些字段,DTO包装送出去的对象
DAO:Data Access Object,即数据访问对象。DAO层用于连接数据库与外层之间的桥梁,并持久化数据层对象
BO:Business Object,即业务对象。用在业务层,当业务复杂、用到比较多的业务对象时,用BO类组合封装所有的对象一并传递
VO:Value Object,或者View Object,即值对象或页面对象。用于web层封装并向view层提供需要展现的数据
特性:
- 声明式:一些功能只需声明需求即可由框架代为实现
- 控制反转:翻转资源获取方向。把“自己创建资源、向环境索取资源”变成“环境将资源准备好”,通过依赖注入的方式实现
- 面向切面编程:在不修改源代码的基础上增强代码功能
- 容器:IOC 是一个容器,包含并管理组件对象的生命周期
- 非侵入式:Spring 对应用程序本身的结构影响小
- 组件化:方便集成其他框架
功能模块:
- Core Container:核心容器,在 Spring 环境下使用任何功能都必须基于 IOC 容器
- AOP:面向切面编程
- Testing:整合对 junit 或 TestNG 测试框架
- Data Access/Integration:提供数据访问/集成的功能
- Spring MVC:提供面向 Web 应用程序的集成功能
控制反转IOC
- IOC概念:
- Java 对象需要调用另一个 Java 对象(被依赖的对象)时, 传统模式下常会用 new 被调用者的代码来创建对象——增加调用者与被调用者的耦合性
- 对象的实例不再由调用者创建,而由 Spring 容器创建。 Spring 容器控制程序之间的关系,此时控制权由调用者转移到 Spring 容器,控制权发生反转
- Spring 容器将被依赖对象,赋值给调用对象的成员变量,相当于为调用者注入它所依赖的实例,即为依赖注入——当对象A运行到需要对象B的时候,IOC容器会主动创建一个对象B注入到对象A需要的地方(IOC容器生成对象是通过反射方式。反射:根据给出的类名(字符串方式)来动态地生成对象。让对象在生成时才决定到底是哪一种对象)
- IoC 容器帮助我们实例化对象并且管理它,我们需要哪个对象,去问 IoC 容器要即可——解决对象之间的耦合问题,使用者不需要了解该对象应当如何创建和初始化
- IOC 是一种通过描述(可以是 xml 或者注解)并通过第三方产生或获取特定对象的方式,Spring 中实现控制反转的是 IOC 容器,实现方法为依赖注入
- IOC 容器中创建、装配、配置的应用组件对象,称为 bean(类的代理?)
- IOC 容器的实现主要基于两个接口:
- BeanFactory:IOC 容器的基本实现,Spring 内部使用的接口(不提供给开发人员)——创建实例时,需要提供 XML 文件的绝对路径
- ApplicationContext:BeanFactory 子接口,面向 Spring 的使用者。几个实现类:
- ClassPathXmlApplicationContext:通过读取类路径下的 XML 配置文件创建 IOC 容器对象
- FileSystemXmlApplicationContext:通过文件系统路径读取 XML 配置文件创建 IOC 容器对象
- ConfigurableApplicationContext:ApplicationContext 的子接口,包含一些扩展方法 refresh() 和 close() ,增加启动、 关闭和刷新上下文的能力
- WebApplicationContext:为 Web 应用准备,基于 Web 环境创建 IOC 容器对象,并将对象引入存入 ServletContext 域中
解耦合
工厂模式解耦合
耦合指的是对象之间的依赖性
原始的创建对象方法:
1
AccountService as = new AccountServiceImpl();
传入全限定类名字符串,通过反射创建对象
1
2
3
4
5
6
7
8
9
10
public static Object getBean(String beanName) {
Object bean = null;
try {
String beanPath = props.getProperty(beanName);
bean = Class.forName(beanPath).newInstance(); //默认构造函数创建对象
} catch (Exception e) {
e.printStackTrace();
}
return bean;
}进一步,读取配置文件的键值对
<String, Object>,通过配置文件的值反射创建对象存入HashMap。之后需要使用时,通过调用GetBean函数,返回一个对应的对象——形成一个单例设计模式1
2
3
4
5
6
7
8
9
10
11
12
13
14
15
16
17
18
19
20
21
22
23
24
25
26
27
28
29
30
31
32
33
34
35
36
37
38
39import java.io.InputStream;
import java.util.Enumeration;
import java.util.HashMap;
import java.util.Map;
import java.util.Properties;
public class BeanFactory {
private static final Properties props;
//定义一个Map,用于存放要创建的对象。把它称之为容器
private static final Map<String, Object> beans;
//静态代码块为Properties对象赋值
static {
try {
props = new Properties();
//获取properties文件的流对象
InputStream in = BeanFactory.class.getClassLoader().getResourceAsStream("bean.properties");
props.load(in);
beans = new HashMap<String, Object>(); //实例化容器
//取出配置文件中所有的Key
Enumeration keys = props.keys();
while (keys.hasMoreElements()) {
//取出每个Key,获取value,创建反射对象,存入容器
String key = keys.nextElement().toString();
String beanPath = props.getProperty(key);
Object value = Class.forName(beanPath).newInstance();
beans.put(key, value);
}
} catch (Exception e) {
throw new ExceptionInInitializerError("初始化properties失败!");
}
}
/**
* 根据bean的名称获取对象
*/
public static Object getBean(String beanName) {
return beans.get(beanName);
}
}工厂:负责向调度方从容器中获取指定被调度对象的类,此时调度方想要获取对象,工厂为调度方查找或创建对象
IOC 解耦合
创建xml配置
1
2
3
4
5
6
7
8
9
<beans xmlns="http://www.springframework.org/schema/beans"
xmlns:xsi="http://www.w3.org/2001/XMLSchema-instance"
xsi:schemaLocation="http://www.springframework.org/schema/beans http://www.springframework.org/schema/beans/spring-beans.xsd">
<!--将对象的创建交给Spring来管理-->
<!--id自定义,class设置bean所对应类型的全类名-->
<bean id="demo1" class="IOC.demo1.hello"/>
</beans>创建被反射的测试类
1
2
3
4
5
6
7package IOC.demo1;
public class hello {
public void Hello(){
System.out.println("hello");
}
}测试:
1
2
3
4
5
6
7
8
9
10
11
12
13
14
15
16package testIOC.testDemo1;
import org.junit.Test;
import org.springframework.context.ApplicationContext;
import org.springframework.context.support.ClassPathXmlApplicationContext;
import IOC.demo1.hello;
public class testdemo1 {
public void testHelloWorld(){
ApplicationContext ac = new ClassPathXmlApplicationContext("demo1.xml");
hello helloworld = (hello) ac.getBean("demo1");
helloworld.Hello();
}
}
Bean标签
- Spring 默认通过反射调用组件类的无参构造函数,来创建组件对象
- 属性:
- id:给对象在容器中提供一个唯一标识,用于获取对象
- class:类的全限定类名。用于反射创建对象。默认情况下调用无参构造函数
- scope:指定对象的作用范围
- singleton:默认值,单例
- prototype:多例
- request:WEB项目中
- session:WEB项目中
- globalsession:WEB项目中。如果没有Portlet环境,则相当于session
- init-method:指定类中的初始化方法名
- destroy-method:指定类中析构方法名
获取Bean
根据 bean 标签的 id 属性可以精确获取到一个组件对象(如IOC解耦合中的例子)
根据类型获取——此时容器中指定类型的bean有且只能有一个:
1
hello helloworld = ac.getBean(hello.class);
根据类型和id获取:
1
hello helloworld = ac.getBean("demo1", hello.class);
如果一个组件类实现了某接口,并且 bean 唯一,可以根据接口获取该 bean 的
Bean的实例化
直接使用构造函数实例化 Bean
1
<bean id="demo1" class="IOC.demo1.hello"/>
使用静态工厂的方法创建对象,静态工厂由 Spring 管理——这里需要体会下工厂的含义,只要我调用它,它就返回给我一个实例
工厂类
1
2
3
4
5
6
7package IOC.demo1;
public class helloStaticFactory {
public static hello createHello(){
return new hello();
}
}配置文件
1
<bean id="helloStatic" class="IOC.demo1.helloStaticFactory" factory-method="createHello" />
- class属性:指定静态工厂的全限定类名
- factory-method属性:指定生产对象的静态方法
使用实例工厂的方法创建对象,实例工厂由 Spring 管理——不是静态方法,要使用先创建工厂类,再创建实际对象
工厂类
1
2
3
4
5
6
7package IOC.demo1;
public class helloFactory {
public hello createHello(){
return new hello();
}
}配置文件
1
2<bean id="instanceFactory" class="IOC.demo1.helloFactory"/>
<bean id="hello" factory-bean="instanceFactory" factory-method="createHello"/>- factory-bean属性:指定实例工厂bean的id
- factory-method属性:指定实例工厂中创建对象的方法。
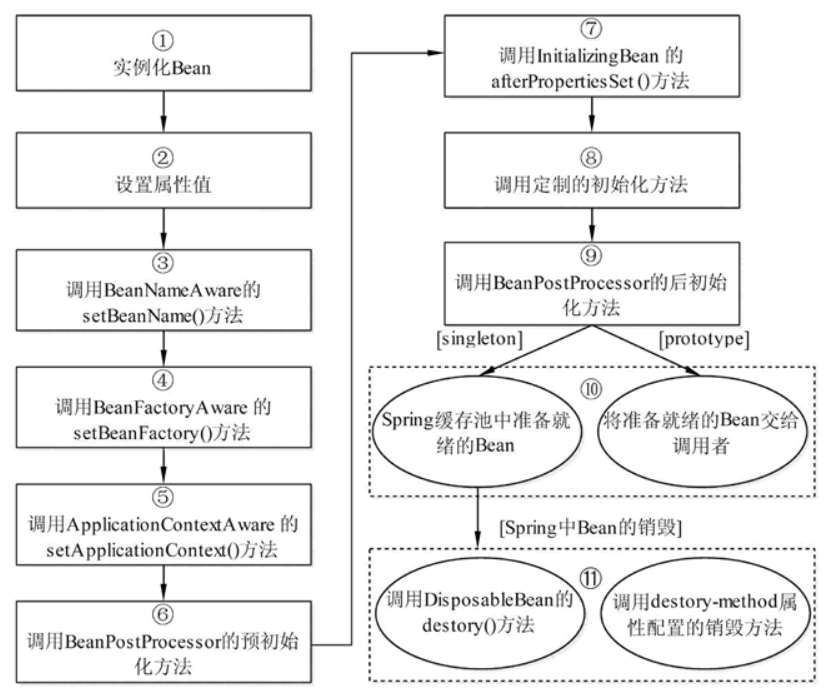
Bean的作用范围与生命周期
作用域:
- singleton(默认):IOC 容器中,该 bean 的对象始终为单实例,在 IOC 容器初始化时创建——一个应用只有一个实例
- prototype:bean 在 IOC 容器中有多个实例,用户获取bean时创建——每次访问时,都会重新创建实例
- WebApplicationContext环境下:
- request:在一个请求范围内有效
- session:在一个会话范围内有效
生命周期(主要指singleton bean,prototype作用域的bean,在创建后就不会再管理后续生命周期):
实例化、属性赋值、初始化、销毁
1
2
3
4
5
6
7
8
9
10
11
12
13
14
15
16
17
18
19
20
21
22
23
24
25
26
27protected Object doCreateBean(String beanName, RootBeanDefinition mbd, Object[] args) throws BeanCreationException {
BeanWrapper instanceWrapper = null;
if (mbd.isSingleton()) {
instanceWrapper = (BeanWrapper)this.factoryBeanInstanceCache.remove(beanName);
}
if (instanceWrapper == null) {
// 实例化阶段
instanceWrapper = this.createBeanInstance(beanName, mbd, args);
}
...
Object exposedObject = bean;
try {
// 属性赋值阶段
this.populateBean(beanName, mbd, instanceWrapper);
// 初始化阶段
exposedObject = this.initializeBean(beanName, exposedObject, mbd);
} catch (Throwable var18) {
...
}
...
}
// 销毁在容器关闭时调用的,ConfigurableApplicationContext.close()- 实例化:为 Bean 对象分配内存空间(调用无参构造器)
- 属性赋值:根据 Spring 上下文对实例化的 Bean 进行依赖注入,即对 Bean 的属性进行初始化
- 初始化:执行一些用户自定义的初始化逻辑
bean对象初始化之前的操作(由bean的后置处理器负责)
bean对象初始化(需在配置bean时指定初始化方法)
bean对象初始化之后的操作(由bean的后置处理器负责)
bean对象就绪,可以使用
bean对象销毁(需在配置bean时指定销毁方法)
IOC容器关闭
一个测试例子:
测试类:
1
2
3
4
5
6
7
8
9
10
11
12
13
14
15
16
17
18
19
20
21
22package IOC.lifeCycle;
public class life {
private Integer life;
public life() {
System.out.println("周期1 创建对象");
}
public void setLife(Integer life) {
this.life = life;
System.out.println("周期2 属性注入");
}
public void init() {
System.out.println("周期3 初始化");
}
public void destory() {
System.out.println("周期5 销毁");
}
}1
2
3
4
5
6
7
8
9
10
11
12
13
* 配置文件与测试:
```xml
<beans xmlns="http://www.springframework.org/schema/beans"
xmlns:xsi="http://www.w3.org/2001/XMLSchema-instance"
xsi:schemaLocation="http://www.springframework.org/schema/beans http://www.springframework.org/schema/beans/spring-beans.xsd">
<bean id="lifeCycle" class="IOC.lifeCycle.life" init-method="init" destroy-method="destory">
<!--依赖注入,见下文-->
<property name="life" value="100"/>
</bean>
</beans>1
2
3
4
5
6
7
public void testLifeCycle() {
ClassPathXmlApplicationContext ac = new ClassPathXmlApplicationContext("lifeCycle.xml");
life test = ac.getBean("lifeCycle", life.class);
System.out.println("周期4 通过IOC获取bean");
ac.close();
}
依赖注入
即,在 IOC 在依赖注入时,初始化组件类对象的属性
属性setter方法注入
测试类:
1
2
3
4
5
6
7
8
9
10
11
12
13
14
15
16
17
18
19
20
21
22package IOC.Inject;
public class Emp {
private Integer id;
private String name;
private Double salary;
public Emp() {
}
public void setId(Integer id) {
this.id = id;
}
public void setName(String name) {
this.name = name;
}
public void setSalary(Double salary) {
this.salary = salary;
}
public void setDepart(Department depart) {
this.depart = depart;
}
}配置bean时为属性赋值:
1
2
3
4
5<bean id="emp" class="IOC.Inject.Emp">
<property name="id" value="100"/>
<property name="name" value="Tim"/>
<property name="salary" value="20.0"/>
</bean>- property标签:通过组件类的setXxx()方法给组件对象设置属性
- name属性:指定属性名(属性名是getXxx()、setXxx()方法定义的,和成员变量无关)
- value属性:指定属性值
- ref属性:引用IOC容器中某个bean的id,将所对应的bean为属性赋值(见下文复杂属性的注入)
- 如果不赋值,则为默认值
构造方法注入
添加有参构造函数
1
2
3
4
5public Emp(Integer id, String name, Double salary) {
this.id = id;
this.name = name;
this.salary = salary;
}Bean 配置:
1
2
3
4
5<bean id="empConstructor" class="IOC.Inject.Emp">
<constructor-arg name="id" value="100"/>
<constructor-arg name="salary" value="22.0"/>
<constructor-arg name="name" value="Tim"/>
</bean>- index属性:指定参数所在位置的索引(从0开始)
- name属性:指定参数名(注意到,bean配置里的参数顺序可以和构造函数的参数不同),并且name的值为形式参数名
复杂属性的注入
注入类类型属性(即,有一个属性为外部类的对象)
在上述类中添加一个测试类Department,Emp类中添加属性depart。二者添加override的toString方法
1
2
3
4
5
6
7
8
9
10
11
12
13
14
15public class Emp {
...
private Department depart; // 类的注入
...
}
public class Department {
private Integer id;
private String name;
public void setId(Integer id) {
this.id = id;
}
public void setName(String name) {
this.name = name;
}
}引用外部已声明的bean
配置Department类型的Bean
1
2
3
4<bean id="departmentSetter" class="IOC.Inject.Department">
<property name="id" value="1111"/>
<property name="name" value="财务"/>
</bean>赋值Emp的depart属性(使用ref)
1
2
3
4
5
6<bean id="empSetterDepart" class="IOC.Inject.Emp">
<property name="id" value="102"/>
<property name="name" value="Tim"/>
<property name="salary" value="20.0"/>
<property name="depart" ref="departmentSetter"/>
</bean>
内部bean
1
2
3
4
5
6
7
8
9
10
11
12
13<bean id="empSetterInnner" class="IOC.Inject.Emp">
<property name="id" value="103"/>
<property name="name" value="Tim"/>
<property name="salary" value="30.0"/>
<property name="depart">
<!-- 在一个bean中再声明一个bean就是内部bean -->
<!-- 内部bean只能用于给属性赋值,不能在外部通过IOC容器获取,因此可以省略id属性 -->
<bean class="Inject.Department">
<property name="id" value="2222"/>
<property name="name" value="人力"/>
</bean>
</property>
</bean>级联属性赋值
1
2
3
4
5
6
7
8
9<bean id="empSetterCascade" class="IOC.Inject.Emp">
<property name="id" value="104"/>
<property name="name" value="Tim"/>
<property name="salary" value="40.0"/>
<!-- 一定先引用某个bean为属性赋值,才可以使用级联方式更新属性 -->
<property name="depart" ref="departmentSetter"/>
<property name="depart.id" value="3333"/>
<property name="depart.name" value="人力"/>
</bean>测试:
1
2
3
4
5
6
7
8
9
10
11
12
13
14
15
16
public void testClassAttribute() {
ClassPathXmlApplicationContext ac = new ClassPathXmlApplicationContext("DependencyInjection.xml");
// 方法1:
Emp emp1 = ac.getBean("empSetterDepart", Emp.class);
System.out.println(emp1);
// 方法2:
Emp emp2 = ac.getBean("empSetterInnner", Emp.class);
System.out.println(emp2);
// 方法3:
Emp emp3 = ac.getBean("empSetterCascade", Emp.class);
System.out.println(emp3);
}
// Emp{id=102, name='Tim', salary=20.0, depart=Department{id=3333, name='人力', emp_list=null}}
// Emp{id=103, name='Tim', salary=30.0, depart=Department{id=2222, name='人力', emp_list=null}}
// Emp{id=104, name='Tim', salary=40.0, depart=Department{id=3333, name='人力', emp_list=null}}这里之所以第一个输出和第三个输出相同,是因为此时spring中对象Department为singleton作用域!
如果改为
<bean id="departmentSetter" class="Inject.Department" scope="prototype">,则输出为1
2
3Emp{id=102, name='Tim', salary=20.0, depart=Department{id=1111, name='财务', emp_list=null}}
Emp{id=103, name='Tim', salary=30.0, depart=Department{id=2222, name='人力', emp_list=null}}
Emp{id=104, name='Tim', salary=40.0, depart=Department{id=3333, name='人力', emp_list=null}}
注入特殊值
- null:
<property name="name"> <null /> </property>。如果为<property name="name" value="null"></property>则name的值为字符串null - 小于号:小于号在xml中定义了标签的开始,因此不能直接使用
<property name="expression" value="a < b"/><property name="expression"> <value><![CDATA[a < b]]></value> </property>——这里CDATA表示纯文本数据,xml解析器看到CDATA时,会将其内容作为纯文本处理,因此该节中写什么符号都随意
- null:
赋值数组类型属性
类Emp添加属性kpis:
1
private double[] kpis;
Bean 配置:
1
2
3
4
5
6
7
8
9
10
11
12
13<bean id="empSetterArray" class="IOC.Inject.Emp">
<property name="id" value="105"/>
<property name="name" value="Tim"/>
<property name="salary" value="40.0"/>
<property name="kpis">
<array>
<value>0.1</value>
<value>0.2</value>
<value>0.3</value>
<value>0.4</value>
</array>
</property>
</bean>
赋值集合类型属性
Emp中添加List属性、Set属性、Map属性和Properties属性
1
2
3
4private List<String> myList;
private Set<Integer> mySet;
private Map<Integer, Department> myMap;
private Properties myProperty;Bean 配置
1
2
3
4
5
6
7
8
9
10
11
12
13
14
15
16
17
18
19
20
21
22
23
24
25
26
27
28
29
30
31
32
33
34
35
36
37
38
39
40
41
42
43
44
45
46
47
48
49
50<bean id="empSetterCollection" class="IOC.Inject.Emp">
<!--给list注入数据-->
<property name="myList">
<list>
<value>AAA</value>
<value>BBB</value>
<value>CCC</value>
</list>
</property>
<!--给Set注入数据-->
<property name="mySet">
<set>
<value>1</value>
<value>2</value>
<value>3</value>
</set>
</property>
<!--给Property注入数据-->
<property name="myProperty">
<props>
<prop key="keya">aaa</prop>
<prop key="keyb">bbb</prop>
</props>
</property>
<!--注入map数据-->
<property name="myMap">
<map>
<entry>
<key>
<value>0</value>
</key>
<ref bean="departOne"/>
</entry>
<entry>
<key>
<value>1</value>
</key>
<ref bean="departTwo"/>
</entry>
</map>
</property>
</bean>
<bean id="departOne" class="IOC.Inject.Department">
<property name="id" value="555"/>
<property name="name" value="资源"/>
</bean>
<bean id="departTwo" class="IOC.Inject.Department">
<property name="id" value="666"/>
<property name="name" value="HR"/>
</bean>
或者引用集合类型的bean:
1
2
3
4
5
6
7
8
9
10
11
12
13
14
15
16
17
18
19
20<beans ...
xmlns:util="http://www.springframework.org/schema/util"
...>
<util:map id="departMap">
<entry>
<key>
<value>0</value>
</key>
<ref bean="departOne"></ref>
</entry>
<entry>
<key>
<value>1</value>
</key>
<ref bean="departTwo"></ref>
</entry>
</util:map>
...
<property name="myMap" ref="departMap"></property>
...
p命名空间注入——和setter方法类似(但需要引入p命名空间依赖)
1
2
3
4
5<beans ...
xmlns:p="http://www.springframework.org/schema/p"
...>
...
<bean id="empPSpace" class="IOC.Inject.Emp" p:id="107" p:name="Tom" p:depart-ref="departOne" p:myMap-ref="departMap"/>外部文件注入(略)
自动装配:bean标签的autowire属性设置自动装配
- byType:根据类型匹配IOC容器中的某个兼容类型的bean,为属性自动赋值。如果有多个符合条件的bean,则会报错
- byName:将需要自动装配的属性的属性名,作为bean的id在IOC容器中匹配相对应的bean,进行赋值(例如,类Emp需要自动装配属性depart,则会在容器中查找id为depart的bean对象,set给属性depart)
注:
- bean 的实例化,和 bean 的依赖注入的区别,个人感觉 bean 的实例化更侧重于控制反转的过程,而 bean 的依赖注入可以认为是属性注入
- bean 的实例化使得调用者获得被调用对象实例,bean 的依赖注入使得被调用实例的属性不需要调用者来设置
基于注解的IOC配置
- 使用注解来管理Bean
- 注解:注解本身不能执行,它只是做一个标记,具体功能的实现上,需要框架检测到注解标记的位置,针对这个位置按照注解标记的功能来执行具体操作——Spring通过扫描的方式进行检测
配置
使用@Component注解配置管理的资源
1
2
3
4
5
6
7
8
9
10
11
12
13
14
15
16package IOC.Annotation;
import org.springframework.stereotype.Controller;
public class UserController { // 控制层组件
}
import org.springframework.stereotype.Service;
public class UserServiceImpl implements UserService { // 业务层组件
}
import org.springframework.stereotype.Repository;
public class UserDaoImpl implements UserDao { // 持久层组件
}XML配置文件开启对注解的支持:(即,确定扫描的文件范围)
全局
1
<context:component-scan base-package="IOC.Annotation"/>
指定要排除的组件
1
2
3
4<context:component-scan base-package="IOC.Annotation">
<!--<context:exclude-filter type="annotation" expression="org.springframework.stereotype.Controller"/>-->
<context:exclude-filter type="assignable" expression="IOC.Annotation.UserController"/>
</context:component-scan>- context:exclude-filter标签:指定排除规则
- type:设置排除或包含的依据
- annotation:根据注解排除,标注了指定注解的组件不要扫描。expression中设置要排除的注解的全类名
- assignable”,根据类型排除。expression中设置要排除的类型的全类名
仅扫描指定组件
1
2
3
4<context:component-scan base-package="IOC.Annotation" use-default-filters="false">
<!--<context:include-filter type="annotation" expression="org.springframework.stereotype.Controller"/>-->
<context:include-filter type="assignable" expression="IOC.Annotation.UserController"/>
</context:component-scan>- context:include-filter标签:在原有扫描规则的基础上追加规则
- use-default-filters属性:取值false表示关闭默认扫描规则——默认规则是扫描指定包下所有类
bean的id:
- 先前使用XML方式管理 bean 的时候,每个 bean 都有一个唯一id,使用注解管理同样会给每个组件配置一个bean id
- 默认:类名首字母小写就是 bean 的id。例如:UserController类对应的 bean id 是userController(此时,注解只是最简单的@Controller)
- 自定义:通过注解的value属性自定义 bean id。例如:
@Service("userService")
常用注解
用于对象创建:
- @Component:将类标识为普通组件
- @Controller:将类标识为控制层组件
- @Service:将类标 识为业务层组件
- @Repository:将类标识为持久层组件
- 后三者只是在@Component注解的基础上起了三个新的名字,提高可读性,对于Spring使用IOC容器管理来说没有区别
用于注入数据:
- @Autowired:对类成员变量、方法以及构造方法进行标注,自动按照类型注入(使用要注入的对象变量名称作为bean的id),此时set方法可以省略,只能注入其他bean类型
- @Qualifier:给字段注入时不能独立使用,必须和@Autowire一起使用;给方法参数注入时,可以独立使用。属性value用于指定bean的id
- @Resource:直接按照Bean的id注入
- (以上只能注入其他Bean类型的数据)
- @Value:注入基本数据类型和 String 类型数据,属性value用于指定具体的值
- 集合类型的注入只能通过XML来实现
- @Scope:指定bean的作用范围,属性value指定范围的值
自动装配:在成员变量上直接标记@Autowired注解即可完成自动装配(也可以标注在构造器和set方法)
1
2
3
4
5
6
public class UserServiceImpl implements UserService {
private UserDao userDao;
}- autowired流程:根据需要的组件类型到 IOC 容器中查找(例如,查找UserDao)
- 如果和所需类型匹配的bean不止一个:
- 没有@Qualifier注解:根据@Autowired标记位置成员变量的变量名作为bean的id进行匹配
- 用@Qualifier注解:根据@Qualifier注解中指定的名称作为bean的id进行匹配
- 如果和所需类型匹配的bean不止一个:
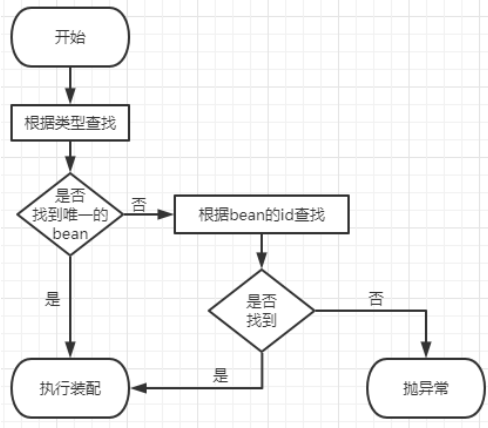
- autowired流程:根据需要的组件类型到 IOC 容器中查找(例如,查找UserDao)
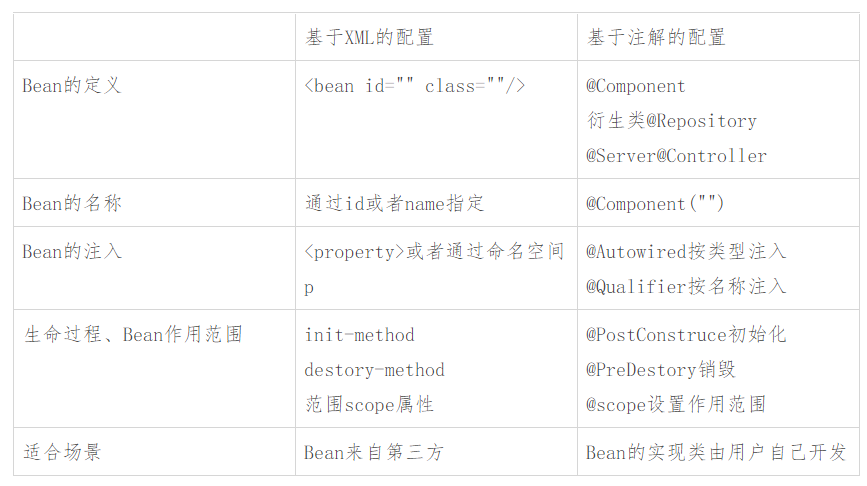
XML与注解
面向切面编程AOP
- 面向切面编程(Aspect Oriented Programming)
代理模式
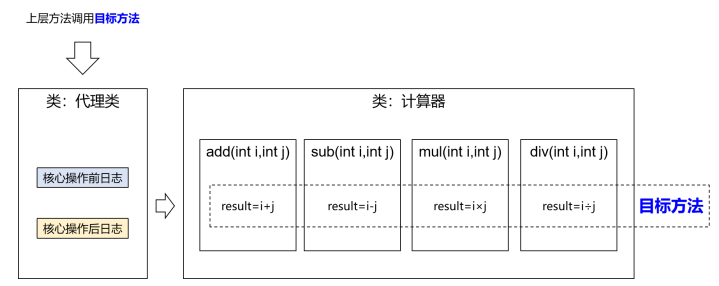
一些附加的功能代码,和业务功能代码混杂(例如,父类“计算器”具有业务功能“加减乘除”,分别由四个函数实现,子类“日志计算器”在每个功能内部添加了日志打印功能)。此时要解耦,要将附加功能的代码抽取出来,但抽取的代码在函数的内部
提供一个代理类,在调用目标类的方法时,不直接调用目标类的方法,而通过代理类间接调用。此时附加功能的代码会剥离出来,成为代理类的方法,让不属于目标方法核心逻辑 的代码从目标方法中剥离出来——解耦
调用目标类的方法时,先调用代理对象的方法
静态代理:
1
2
3
4
5
6
7
8
9
10
11
12
13
14
15
16public class CalculatorStaticProxy implements Calculator {
// 将被代理的目标对象声明为成员变量
private Calculator target;
public CalculatorStaticProxy(Calculator target) {
this.target = target;
}
public int add(int i, int j) {
// 附加功能由代理类中的代理方法来实现
System.out.println("[日志] add 方法开始了,参数是:" + i + "," + j);
// 通过目标对象来实现核心业务逻辑
int addResult = target.add(i, j);
System.out.println("[日志] add 方法结束了,结果是:" + addResult);
return addResult;
}
}生成代理对象的工厂类(动态代理):利用反射,在运行时创建一个实现某些给定接口的新类(“动态代理类”)及其实例,代理的是接口而不是类
- 可以实现AOP编程
- Proxy类的代码被固定下来,不会因为业务的逐渐庞大而庞大(静态代理中,如果目标类方法数量越来越多,其代码量也越来越多)
- (是否可以认为,动态代理类将目标类的所有方法,都用invoke重写了?即,每个目标类的方法,都添加了相同的代码?)
- 参考文章:java动态代理Proxy.newProxyInstance、java动态代理中的invoke方法
1
2
3
4
5
6
7
8
9
10
11
12
13
14
15
16
17
18
19
20
21
22
23
24
25
26
27
28
29
30
31
32
33
34
35
36
37
38
39
40public class ProxyFactory {
private Object target; // 目标对象,即被代理的类
public ProxyFactory(Object target) {
this.target = target;
}
public Object getProxy(){
/**
* newProxyInstance():创建一个代理实例
* 其中有三个参数:
* 1、classLoader:加载动态生成的代理类的类加载器
* 2、interfaces:目标对象实现的所有接口的class对象所组成的数组(动态代理类需要实现的接口)
* 3、invocationHandler:设置代理对象实现目标对象方法的过程,即代理类中如何重写接口中的抽象方法
*/
ClassLoader classLoader = target.getClass().getClassLoader();
Class<?>[] interfaces = target.getClass().getInterfaces();
InvocationHandler invocationHandler = new InvocationHandler() {
public Object invoke(Object proxy, Method method, Object[] args) throws Throwable {
/**
* proxy:代理对象
* method:代理对象需要实现的方法,即其中需要重写的方法
* args:method所对应方法的参数
*/
Object result = null;
try {
System.out.println("[动态代理][日志] "+method.getName()+",参数:"+ Arrays.toString(args));
result = method.invoke(target, args);
System.out.println("[动态代理][日志] "+method.getName()+",结果:"+ result);
} catch (Exception e) {
e.printStackTrace();
System.out.println("[动态代理][日志] "+method.getName()+",异常:"+e.getMessage());
} finally {
System.out.println("[动态代理][日志] "+method.getName()+",方法执行完毕");
}
return result;
}
};
return Proxy.newProxyInstance(classLoader, interfaces, invocationHandler);
}
}测试:
1
2
3
4
5
6
7
8
9
10
11
12
13
14
15
16
public void test() {
ProxyFactory factory = new ProxyFactory(new CalculatorImp());
Calculator proxy = (Calculator) factory.getProxy();
System.out.println(proxy.getClass().getName());
Method[] methods = proxy.getClass().getMethods();
for (Method m: methods) {
System.out.println(m.getName());
}
System.out.println(Arrays.toString(proxy.getClass().getInterfaces()));
proxy.div(0, 1);
proxy.add(0, 1);
}- Calculator为接口,CalculatorImp为接口的实现类
- 此时接口中每个方法都被添加了日志输出功能
AOP概念
通过预编译方式和运行期动态代理方式,在不修改源代码的情况下给程序动态统一添加额外功能
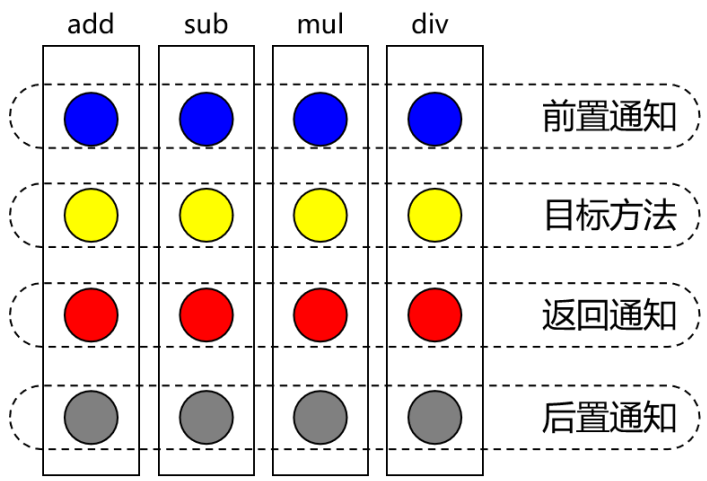
横切关注点:
- 从每一个方法中抽取出来的同一类非核心功能——例如,上面例子中的日志打印功能
- 根据附加功能的逻辑进行区分:有多个附加功能,就有多个横切关注点
通知:每一个横切关注点上的功能,都需要一个方法来实现。该方法称为通知方法(例如,日志打印)
前置通知:在被代理的目标方法前执行
返回通知:在被代理的目标方法成功结束后执行
异常通知:在被代理的目标方法异常结束后执行
后置通知:在被代理的目标方法最终结束后执行
环绕通知:使用try…catch…finally结构,围绕整个被代理的目标方法
顺序:
- Spring版本5.3.x以前:前置通知 目标操作 后置通知 返回通知或异常通知
- Spring版本5.3.x以后:前置通知 目标操作 返回通知或异常通知 后置通知
切面:封装通知方法的类
目标:被代理的目标对象
代理:向目标对象应用通知之后,创建的代理对象
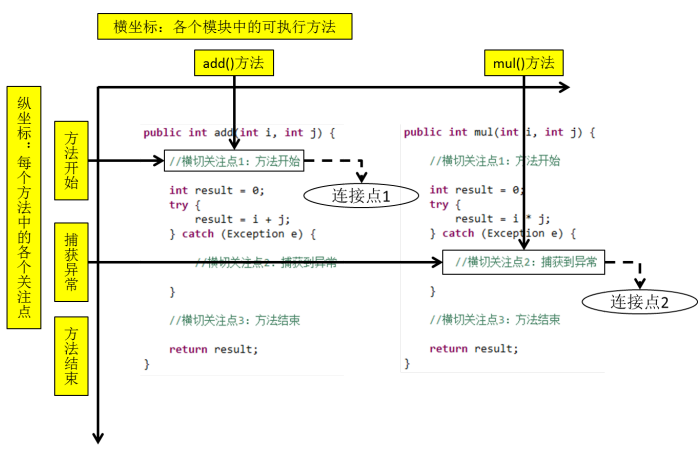
连接点:一个逻辑概念。将要进行抽取的方法排成一排,每一个横切位置看成x轴方向,把方法从上到下执行的顺序看成y轴,x轴和y轴交叉点是连接点
切入点:定位连接点的方式
- 每个类的方法都包含多个连接点
- Spring 的 AOP 技术通过切入点定位到特定的连接点。
- 切入点通过 org.springframework.aop.Pointcut 接口描述,使用类和方法作为连接点的查询条件
作用:
- 简化代码:方法中固定位置的重复代码抽取出来
- 代码增强:特定的功能封装到切面类中,哪里有需要就往上套,相关的方法被切面增强
基于注解的AOP
结构
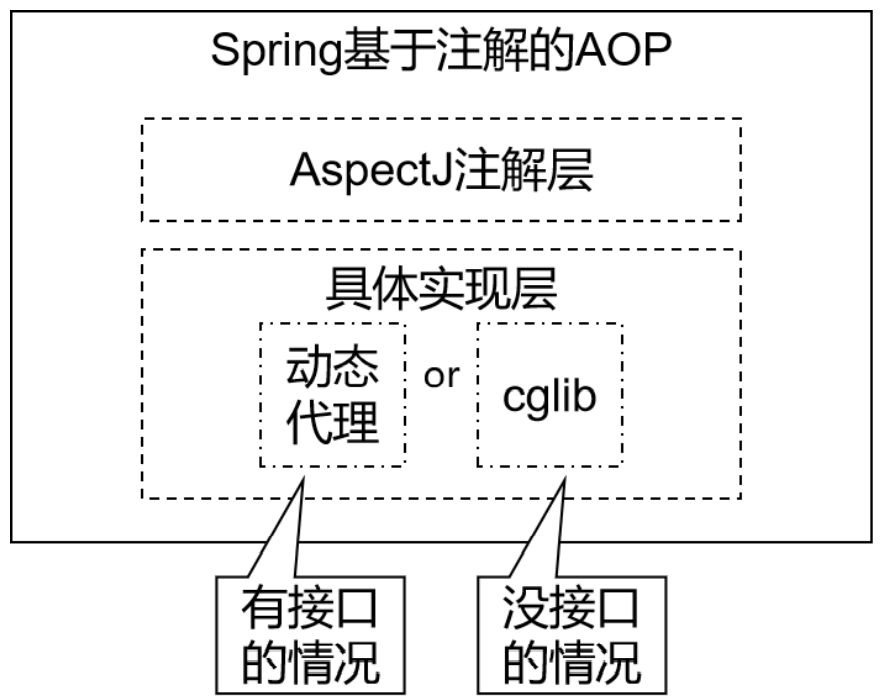
- 动态代理:被代理的目标类必须实现某个接口。代理对象和目标对象实现同样的接口
- cglib:继承被代理的目标类实现代理,此时不需要目标类实现接口
- AspectJ:本质上是静态代理,将代理逻辑“织入”被代理的目标类编译得到的字节码文件,最终效果是动态的。weaver是织入器。Spring只是借用了AspectJ中的注解
范例
依赖:
1
2
3
4
5<dependency>
<groupId>org.springframework</groupId>
<artifactId>spring-aspects</artifactId>
<version>5.2.14.RELEASE</version>
</dependency>目标类(被代理的类)
1
2
3
4
5
6
7
8
9
10
11
12
13
14
15
16
17
18
19
20
21
22
23
24
25
26
27
28
29
30
31
32package AOP.Aspect;
public interface Calculator {
public int add(int a, int b);
public int sub(int a, int b);
public int mul(int a, int b);
public int div(int a, int b);
}
public class CalculatorImp implements Calculator {
public int add(int a, int b) {
int result = a + b;
return result;
}
public int sub(int a, int b) {
int result = a - b;
return result;
}
public int mul(int a, int b) {
int result = a * b;
return result;
}
public int div(int a, int b) {
int result = a / b;
return result;
}
}切面类:(例如,日志功能的切面类)
1
2
3
4
5
6
7
8
9
10
11
12
13
14
15
16
17
18
19
20
21
22
23
24
25
26
27
28
29
30
31
32
33
34
35
36
37
38
39
40
41
42
43
44
45
46
47
48
49
50
51
52
53
54
55
56
57
58
59
60
61
62
63
64
65
66
67
68
69
70package AOP.Aspect;
import org.aspectj.lang.JoinPoint;
import org.aspectj.lang.ProceedingJoinPoint;
import org.aspectj.lang.annotation.*;
import org.springframework.stereotype.Component;
import java.util.Arrays;
// Aspect表示这个类是一个切面类
// 切面类放入IOC容器
public class LoggerAspect {
// 本方法标识为前置通知
public void beforeMethod(JoinPoint joinPoint){
String methodName = joinPoint.getSignature().getName();
String args = Arrays.toString(joinPoint.getArgs());
System.out.println("Logger-->前置通知,方法名:"+methodName+",参数:"+args);
}
// 不在乎返回值,不在乎权限修饰符,不在乎是哪个方法,不在乎方法的参数
public void afterMethod(JoinPoint joinPoint){
String methodName = joinPoint.getSignature().getName();
System.out.println("Logger-->后置通知,方法名:"+methodName);
}
// 重用切入点表达式
public void beforePointCut(){}
public void beforeMethodReUse(JoinPoint joinPoint){
String methodName = joinPoint.getSignature().getName();
String args = Arrays.toString(joinPoint.getArgs());
System.out.println("Logger-->前置通知,方法名:"+methodName+",参数:"+args);
}
public void afterReturningMethod(JoinPoint joinPoint, Object result){
String methodName = joinPoint.getSignature().getName();
System.out.println("Logger-->返回通知,方法名:"+methodName+",结果:"+result);
}
public void afterThrowingMethod(JoinPoint joinPoint, Throwable ex){
String methodName = joinPoint.getSignature().getName();
System.out.println("Logger-->异常通知,方法名:"+methodName+",异常:"+ex);
}
public Object aroundMethod(ProceedingJoinPoint joinPoint){
String methodName = joinPoint.getSignature().getName();
String args = Arrays.toString(joinPoint.getArgs());
Object result = null;
try {
System.out.println("环绕通知-->目标对象方法执行之前");
//目标对象(连接点)方法的执行
result = joinPoint.proceed();
System.out.println("环绕通知-->目标对象方法返回值之后");
} catch (Throwable throwable) {
throwable.printStackTrace();
System.out.println("环绕通知-->目标对象方法出现异常时");
} finally {
System.out.println("环绕通知-->目标对象方法执行完毕");
}
return result;
}
}切面中,需要通过指定的注解,将切面中的方法标识为通知方法
切入点表达式(设置在注解的value属性中):通过切入点表达式,将抽取出来的通知方法,重新套入到目标方法中
- 通过切入点表达式,定位到连接点(通知要作用到的位置)
- 表达式格式:
- 目标方法权限 + 目标方法返回类型 + 目标方法所在的全类名 + 目标方法的参数列表(只需要类型)
- 例如:
@Before("execution(public int AOP.Aspect.CalculatorImp.add(int, int))")表示,接下来的方法,是目标方法add的前置通知 - 如果不在乎权限修饰符、返回类型,则直接用 * 代替。同样的,如果不在乎哪个包、类,则都可以用 * 代替
在通知方法的参数中,添加 joinPoint,可以获得连接点对应方法(目标方法)的信息
重用切入点表达式:
- 此时注解中value的值为方法名
- 该方法为空,将该方法的注解的value作为当前切入点表达式的value
注解Before:在目标对象方法执行之前运行
注解After:在目标对象方法的finally子句中执行(参考动态代理工厂类)
注解AfterReturning:在目标对象方法运行完成执行(没有异常时才执行),参考动态代理工厂类中的:
1
2result = method.invoke(target, args);
System.out.println("[动态代理][日志] "+method.getName()+",结果:"+ result);- 注解中的returning属性的值,将通知方法的某个参数指定为接收目标方法返回值的参数
注解AfterThrowing:在目标对象方法的catch子句中执行(参考动态代理工厂类)。其中的属性throwing含义同上
注解Around:环绕通知。需要指定目标方法进行操作的位置,并且返回值是目标方法的返回值——一般而言,要么只有一个位置的通知,要么直接用环绕通知
可以重新看看前面的代理工厂类,体会下这里不同通知对应的位置在哪里
将目标对象和切面类交给IOC管理(通过注解)
1
2
3
4
5
6
7
8
9
10
<beans xmlns="http://www.springframework.org/schema/beans"
xmlns:xsi="http://www.w3.org/2001/XMLSchema-instance"
xmlns:context="http://www.springframework.org/schema/context"
xmlns:aop="http://www.springframework.org/schema/aop"
xsi:schemaLocation="http://www.springframework.org/schema/beans http://www.springframework.org/schema/beans/spring-beans.xsd http://www.springframework.org/schema/context https://www.springframework.org/schema/context/spring-context.xsd http://www.springframework.org/schema/aop https://www.springframework.org/schema/aop/spring-aop.xsd">
<context:component-scan base-package="AOP.Aspect"> </context:component-scan>
<aop:aspectj-autoproxy /> <!--开启AspectJ的自动代理,为目标对象自动生成代理-->
</beans>测试:
1
2
3
4
5
6
7
8
9
public void test() {
ApplicationContext ac = new ClassPathXmlApplicationContext("aop-annotation.xml");
Calculator calculator = ac.getBean(Calculator.class);
calculator.add(1, 1);
calculator.sub(1, 1);
calculator.mul(1, 0);
calculator.div(1, 0);
}1
2
3
4
5
6
7
8
9
10
11
12
13
14
15Logger-->前置通知,方法名:add,参数:[1, 1]
Logger-->返回通知,方法名:add,结果:2
Logger-->后置通知,方法名:add
Logger-->前置通知,方法名:sub,参数:[1, 1]
Logger-->返回通知,方法名:sub,结果:0
Logger-->后置通知,方法名:sub
环绕通知-->目标对象方法执行之前
Logger-->返回通知,方法名:mul,结果:0
Logger-->后置通知,方法名:mul
环绕通知-->目标对象方法返回值之后
环绕通知-->目标对象方法执行完毕
Logger-->异常通知,方法名:div,异常:java.lang.ArithmeticException: / by zero
Logger-->后置通知,方法名:div
java.lang.ArithmeticException: / by zero切面的优先级
当一个目标方法具有多个切面类时,需要给定切面执行的优先顺序
每个切面都有一个优先级(int值),值越小,优先级越高。默认为int的最大值
1
2
3
4
5
6
7import org.springframework.core.annotation.Order;
// Aspect表示这个类是一个切面类
// 切面类放入IOC容器
public class LoggerAspect {
...
基于XML的AOP
略
声明式事务
JdbcTemplate
- Spring 使用 Spring jdbc 操作数据库(通过JdbcTemplate这个类来实现增删改查操作)——实际上,可以用 MyBatis 代替 Spring jdbc,以面向对象的方式来操作持久层对象
声明式事务
编程式事务:事务功能的相关操作全部通过代码实现
1
2
3
4
5
6
7
8
9
10
11
12
13
14Connection conn = ...;
try {
// 开启事务:关闭事务的自动提交
conn.setAutoCommit(false);
// 核心操作
// 提交事务
conn.commit();
}catch(Exception e){
// 回滚事务
conn.rollBack();
}finally{
// 释放数据库连接
conn.close();
}声明式事务:将事务控制的代码抽取出来(AOP)封装
配置文件中添加配置,开启事务的注解驱动
1
2
3
4
5
6
7
8
9
10
11
12
13
14
15
16
17
18
19
20xmlns:tx="http://www.springframework.org/schema/tx"
...
<!--扫描组件-->
<context:component-scan base-package="Transcation"> </context:component-scan>
<!-- 导入外部属性文件 -->
<context:property-placeholder location="classpath:jdbc.properties" />
<!--数据库连接池-->
<bean id="dataSource" class="com.alibaba.druid.pool.DruidDataSource">
<property name="driverClassName" value="${jdbc.driver}"></property>
<property name="url" value="${jdbc.url}"></property>
<property name="username" value="${jdbc.username}"></property>
<property name="password" value="${jdbc.password}"></property>
</bean>
<!--配置事务管理器-->
<bean id="transactionManager" class="org.springframework.jdbc.datasource.DataSourceTransactionManager">
<property name="dataSource" ref="dataSource"></property>
</bean>
<tx:annotation-driven transaction-manager="transactionManager" />Service 层添加@Transactional 注解(通过 Service 层进行事务管理,service层中一个方法表示一个功能)
同一个类中,一个没有事务的方法A,去调用另一个有事务的方法B时,因为是直接调用,而不是调用代理类,此时事务不起作用
@Transactional标识在方法上,只会影响该方法,标识在类上则会影响类中所有的 public 方法
事务属性:
只读:(便于针对查询操作来进行优化)
1
2
public void ...超时回滚:
1
2
public void ...回滚策略:直接使用
@Transactional不指定rollbackFor时,Exception及其子类都不会触发回滚rollbackFor属性:需要设置一个Class类型的对象——指定能够触发事务回滚的异常类型,可以指定多个,用逗号分隔
rollbackForClassName属性:需要设置一个字符串类型的全类名
noRollbackFor属性:需要设置一个Class类型的对象
noRollbackForClassName属性:需要设置一个字符串类型的全类名——设置不需要进行回滚的异常类名称数组
1
2
3
//@Transactional(noRollbackForClassName = "java.lang.ArithmeticException")
public void ...
事务隔离级别:
读未提交:READ UNCOMMITTED,允许Transaction01读取Transaction02未提交的修改
读已提交:READ COMMITTED,Transaction01只能读取Transaction02已提交的修改(Oracle 默认)
可重复读:REPEATABLE READ,Transaction01可以多次从一个字段中读取到相同的值,即Transaction01执行期间禁止其它事务对这个字段进行更新(MySQL 默认)
串行化:SERIALIZABLE,确保Transaction01可以多次从一个表中读取到相同的行,在Transaction01执行期间,禁止其它事务对这个表进行添加、更新、删除操作。可以避免任何并发问题,但性能十分低下
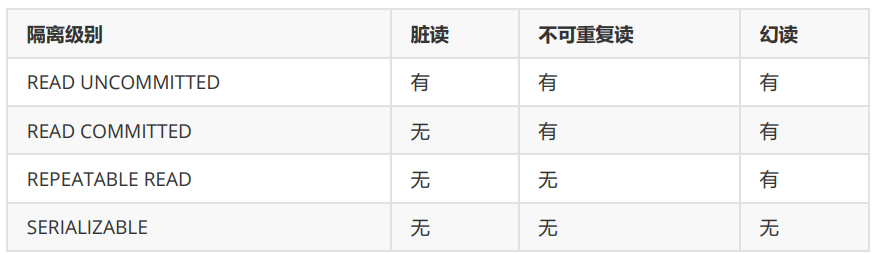
脏读:一事务对数据进行了增删改,但未提交,另一事务可以读取到未提交的数据。如果第一个事务这时候回滚了,那么第二个事务就读到了脏数据
不可重复读:一个事务中发生了两次读操作,第一次读操作和第二次操作之间,另外一个事务对数据进行了修改,这时候两次读取的数据是不一致的
幻读:第一个事务对一定范围的数据进行批量修改,第二个事务在这个范围增加一条数据,第一个事务会丢失对新增数据的修改
1
2
3
4
5//使用数据库默认的隔离级别
//读未提交
//读已提交
//可重复读
//串行化事务传播:当事务方法被另一个事务方法调用时,必须指定事务应该如何传播。例如,可能继续在现有事务中运行,也可能开启一个新事务运行
@Transactional的propagation属性设置事务传播行为
@Transactional(propagation = Propagation.REQUIRED):默认情况,表示如果当前线程上有已经开启的事务,则在这个事务中运行,此时如果有一个事务不满足,则这个链上的所有操作都进行回滚
@Transactional(propagation = Propagation.REQUIRES_NEW):不管当前线程上是否有已经开启的事务,都要开启新事务
以买书为例,用户有100元,进行一个事务:买多本书。而买一本书也是一个事务。此时如果为前者,则会在当前买多本书的事务中运行,如果最后余额不足,回滚会导致一本书也没有买到;如果为后者,则每次买书都是在“买一本书”这个事务上进行,因此只有余额不足时才回滚买一本书的事务
1
2
3
4
5
6
7
8
9
10
11
12
13
14
15
16
17
18
19
20
21
22
23
//一次购买多本图书
public void checkout(Integer[] bookIds, Integer userId) {
for (Integer bookId : bookIds) {
bookService.buyBook(bookId, userId);
}
}
public void buyBook(Integer bookId, Integer userId) {
try {
TimeUnit.SECONDS.sleep(5);
} catch (InterruptedException e) {
e.printStackTrace();
}
//查询图书的价格
Integer price = bookDao.getPriceByBookId(bookId);
//更新图书的库存
bookDao.updateStock(bookId);
//更新用户的余额
bookDao.updateBalance(userId, price);
//System.out.println(1/0);
}
基于XML的声明式事务
略
Spring与MyBatis的整合
- 在 Spring 环境中使用 MyBatis 更加简单,甚至可以不用 SqlSessionFactory、 SqlSession 等对象,只需要定义mapper接口,配置对应的mapper.xml,这样就可以直接通过mapper接口直接执行数据库操作
- MyBatis中,想获得dao对象 –> sqlSession对象 –> sqlSessionFactory对象调用opensession()方法 –> 读取mybatis的主配置文件
- Spring整合:
- 独立的连接池类的对象
- SqlSessionFactory对象
- DAO对象
整合
使用之前MyBatis的数据库和表Emp
依赖:
1
2
3
4
5
6
7
8
9
10
11
12
13
14
15
16
17
18
19
20
21
22
23
24
25
26
27
28
29
30
31
32
33
34
35
36
37
38
39
40
41
42
43
44
45
46
47
48
49
50
51
52
53
54
55
56
57
58
59
60
61
62
63
64
65
66
67
68
69
70
71
72
73
74
75
76
77
78
79
80
81
82
83
84
85
86
87<dependencies>
<!-- 基于Maven依赖传递性,导入spring-context依赖即可导入当前所需所有jar包 -->
<dependency>
<groupId>org.springframework</groupId>
<artifactId>spring-context</artifactId>
<version>5.2.14.RELEASE</version>
</dependency>
<dependency>
<groupId>org.springframework</groupId>
<artifactId>spring-aspects</artifactId>
<version>5.2.14.RELEASE</version>
</dependency>
<!--事务-->
<dependency>
<groupId>org.springframework</groupId>
<artifactId>spring-tx</artifactId>
<version>5.2.14.RELEASE</version>
</dependency>
<!--事务相关-->
<dependency>
<groupId>org.springframework</groupId>
<artifactId>spring-jdbc</artifactId>
<version>5.2.14.RELEASE</version>
</dependency>
<!--mybatis依赖-->
<dependency>
<groupId>org.mybatis</groupId>
<artifactId>mybatis</artifactId>
<version>3.5.7</version>
</dependency>
<!--mybatis与spring集成的依赖-->
<dependency>
<groupId>org.mybatis</groupId>
<artifactId>mybatis-spring</artifactId>
<version>2.0.4</version>
</dependency>
<!--德鲁伊连接池-->
<dependency>
<groupId>com.alibaba</groupId>
<artifactId>druid</artifactId>
<version>1.1.23</version>
</dependency>
<!--驱动-->
<dependency>
<groupId>mysql</groupId>
<artifactId>mysql-connector-java</artifactId>
<version>5.1.3</version>
</dependency>
<!--spring-test(对JUnit的封装)-->
<dependency>
<groupId>org.springframework</groupId>
<artifactId>spring-test</artifactId>
<version>5.2.14.RELEASE</version>
<scope>test</scope>
</dependency>
<!-- junit测试 -->
<dependency>
<groupId>junit</groupId>
<artifactId>junit</artifactId>
<version>4.12</version>
<scope>test</scope>
</dependency>
</dependencies>
<build>
<!--目的是把src/main/java目录中的xml文件包含到输出结果中。输出到classes目录中-->
<resources>
<resource>
<directory>src/main/java</directory><!--所在的目录 -->
<includes>
<!--包括目录下的.properties、.xml文件都会扫描-->
<include>**/*.properties</include>
<include>**/*.xml</include>
</includes>
<filtering>false</filtering>
</resource>
</resources>
</build>创建Service接口和实现类(
main/java/CombineMyBatis/Service/)1
2
3
4
5
6
7
8
9
10
11
12
13
14
15
16
17
18
19
20
21
22
23
24
25
26
27
28
29
30
31
32
33
34
35
36
37
38
39
40
41
42
43
44
45package CombineMyBatis.Service;
import CombineMyBatis.Pojo.Emp;
import java.util.List;
public interface EmpService {
List<Emp> findAllEmp();
void insertEmp(Emp emp);
void update(Emp emp);
void deleteEmp(Emp emp);
}
public class EmpServiceImp implements EmpService {
private EmpDao empDao;
public void setEmpDao(EmpDao empDao) {
this.empDao = empDao;
}
public List<Emp> findAllEmp() {
return empDao.findAll();
}
public void insertEmp(Emp emp) {
empDao.insertEmp(emp);
}
public void update(Emp emp) {
empDao.updateEmp(emp);
}
public void deleteEmp(Emp emp) {
empDao.deleteEmp(emp);
}
}创建PoJo对象(
main/java/CombineMyBatis/Pojo/)1
2
3
4
5
6
7
8
9
10
11
12
13
14
15
16
17
18
19
20package CombineMyBatis.Pojo;
public class Emp {
private Integer id;
private String name;
private String job;
private Double salary;
// (get、set方法)
public String toString() {
return "Emp{" +
"id=" + id +
", name='" + name + '\'' +
", job='" + job + '\'' +
", salary=" + salary +
'}';
}
}创建Dao接口(
main/java/CombineMyBatis/Dao/)1
2
3
4
5
6
7
8
9
10
11
12
13
14
15package CombineMyBatis.Dao;
import CombineMyBatis.Pojo.Emp;
import java.util.List;
public interface EmpDao {
List<Emp> findAll();
void insertEmp(Emp emp);
void updateEmp(Emp emp);
void deleteEmp(Emp emp);
}四个配置文件:
jdbc.properties(
main/resources/jdbc.properties)1
2
3
4=jdbc:mysql://localhost:3306/testMyBatis?characterEncoding=utf8
=root
=123456
=10mybatis配置(
main/resources/mybatis-config.xml)1
2
3
4
5
6
7
8
9
10
11
12
13
14
15
16
17
18
19
20
21
22
<configuration>
<!--settings:控制mybatis全局行为-->
<settings>
<setting name="logImpl" value="STDOUT_LOGGING"/>
</settings>
<!--设置别名-->
<typeAliases>
<!--name:实体类所在的包名-->
<package name="CombineMyBatis.Pojo"/>
</typeAliases>
<!--sql mapper(sql映射文件)的位置 -->
<mappers>
<!--name:是包名,这个包中的所有mapper.xml一次都能加载-->
<package name="CombineMyBatis.Dao"/>
</mappers>
</configuration>Dao接口对应的mapper配置(
main/java/CombineMyBatis/Dao/EmpDao.xml)1
2
3
4
5
6
7
8
9
10
11
12
13
14
15
16
17
18
19
20
21
22
<mapper namespace="CombineMyBatis.Dao.EmpDao">
<insert id="insertEmp">
insert into emp values (#{id}, #{name}, #{job}, #{salary})
</insert>
<select id="findAll" resultType="CombineMyBatis.Pojo.Emp">
select * from emp;
</select>
<select id="updateEmp">
update emp set job=#{job}, salary=#{job} where id=#{id}
</select>
<update id="deleteEmp">
delete from emp where id=#{id}
</update>
</mapper>Spring配置(
main/resources/applicationContext.xml)1
2
3
4
5
6
7
8
9
10
11
12
13
14
15
16
17
18
19
20
21
22
23
24
25
26
27
28
29
30
31
32
33
34
35
36
37
38
39
40
41
42
43
44
45
46
47
48
49
50
51
52
53
54
55
56
57
58
59
60
61
62
63
64
65
66
67
<beans xmlns="http://www.springframework.org/schema/beans"
xmlns:xsi="http://www.w3.org/2001/XMLSchema-instance"
xmlns:util="http://www.springframework.org/schema/util"
xmlns:aop="http://www.springframework.org/schema/aop"
xmlns:tx="http://www.springframework.org/schema/tx"
xmlns:context="http://www.springframework.org/schema/context"
xsi:schemaLocation="http://www.springframework.org/schema/beans http://www.springframework.org/schema/beans/spring-beans.xsd
http://www.springframework.org/schema/util http://www.springframework.org/schema/util/spring-util.xsd
http://www.springframework.org/schema/context http://www.springframework.org/schema/context/spring-context.xsd
http://www.springframework.org/schema/aop http://www.springframework.org/schema/aop/spring-aop.xsd
http://www.springframework.org/schema/tx http://www.springframework.org/schema/tx/spring-tx.xsd">
<!--开启组件扫描(全包扫描的方式)-->
<context:component-scan base-package="CombineMyBatis"/>
<!--引入外部属性文件-->
<context:property-placeholder location="classpath:jdbc.properties"/>
<!--声明数据源,配置连接池-->
<bean id="dataSource" class="com.alibaba.druid.pool.DruidDataSource"
init-method="init" destroy-method="close">
<!-- driverClassName可以不要(官方明确说明)-->
<!-- <property name="driverClassName" value="${prop.driverClass}"></property>-->
<property name="url" value="${prop.url}"/>
<property name="username" value="${prop.userName}"/>
<property name="password" value="${prop.password}"/>
<property name="maxActive" value="${prop.maxActive}"/>
</bean>
<!--声明的是mybatis中提供的SqlSessionFactoryBean类,这个类内部创建SqlSessionFactory的-->
<bean id="sqlSessionFactory" class="org.mybatis.spring.SqlSessionFactoryBean">
<!--set注入,把数据库连接池赋给dataSource属性-->
<property name="dataSource" ref="dataSource"/>
<!--mybatis主配置文件的位置
configLocation属性是Resource类型,读取配置文件
value指定文件的路径,使用classpath:表示文件的位置-->
<property name="configLocation" value="classpath:mybatis-config.xml"/>
</bean>
<!--创建dao对象,使用sqlSession的getMapper (StudentDao.class )
MapperScannerConfigurer:在内部调用getMapper()生成每个dao接口的代理对象-->
<bean class="org.mybatis.spring.mapper.MapperScannerConfigurer">
<!--指定SqlSess ionFactory对象的-->
<property name="sqlSessionFactoryBeanName" value="sqlSessionFactory"/>
<!--指定包名,包名是dao接口所在的包名。
MapperScannerConfigurer会扫描这个包中的所有接口,对每个接口执行一次getMapper()方法,得到每个接口的dao对象。
创建好的dao对象放入 IOC 容器中。xml文件名和Dao接口名相同-->
<property name="basePackage" value="CombineMyBatis.Dao"/>
</bean>
<!--声明Service-->
<bean id="empServiceImpl" class="CombineMyBatis.Service.EmpServiceImp">
<property name="empDao" ref="empDao"/>
</bean>
<!--配置事务管理器-->
<bean id="transactionManager" class="org.springframework.jdbc.datasource.DataSourceTransactionManager">
<property name="dataSource" ref="dataSource"/>
</bean>
<!--使用注解式事务-->
<tx:annotation-driven transaction-manager="transactionManager" />
<!--基于注解的AOP-->
<context:component-scan base-package="CombineMyBatis"> </context:component-scan>
<aop:aspectj-autoproxy />
</beans>测试:
1
2
3
4
5
6
7
8
9
10
11
12
13
14
15
16
17
18
19
20
21
22
23
24
25
26package testMyBatis;
...
//单元测试框架
//加载配置文件
public class testMyBatis {
//注入
private EmpServiceImp empService;
//查询所有数据
public void findAll() {
List<Emp> list = empService.findAllEmp();
...
}
//添加一条数据
public void add() {
Emp emp = new Emp();
emp.setId(100);
emp.setName("xxx");
emp.setSalary(109.73);
empService.insertEmp(emp);
...
}
}
关于ClassPath
项目打包为jar包:一个应用通常分成几个单元,每个单元用jar包封装,并相互依赖
1
2
3
4
5
6
7
8
9tools.jar
| resource.xml // 资源配置文件
| other.xml
|
|— META-INF
MANIFEST.MF // jar包的描述文件
|— com // 类的包目录
|—test
util.class // java类文件项目打包为war包:Java web项目是打成WAR包发布,因此classpath会指定在编译后的classes文件中找相关的xml文件
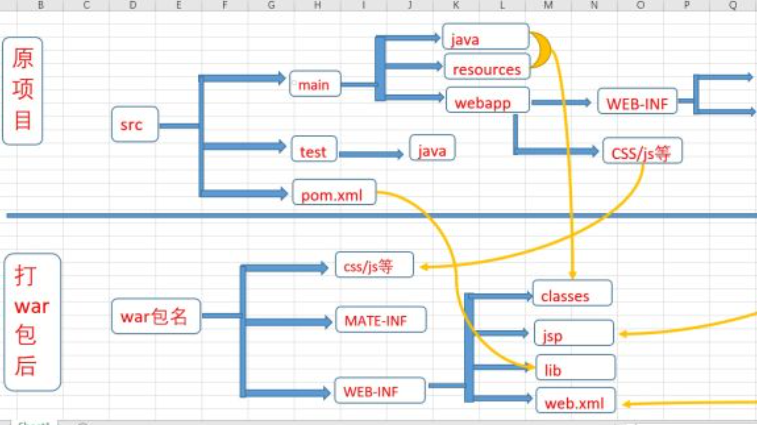
classpath*:**/mapper/mapping/*Mapper.xml:classpath*:这种前缀,可以代表多个匹配的文件**/mapper/mapping/*Mapper.xml,双星号**表示在任意目录下,即WEB-INF/classes/下任意层的目录,只要符合后面的文件路径,都会被作为资源文件找到
参考: