SpringMVC:概述、控制器方法、RESTful风格范例
概述
MVC模式:
一种软件设计规范(架构模式),将业务逻辑、数据、显示分离的方法来组织代码,降低视图与业务逻辑的耦合
- Model:数据模型,提供要展示的数据。例如JavaBean组件(包含数据和行为)——模型数据查询和模型数据更新等功能
- JavaBean:一个遵循特定写法的Java类,其它程序可以通过反射实例化JavaBean对象
- 必须具有一个无参的构造函数
- 属性必须私有化
- 私有化的属性必须通过public类型的方法暴露给其它程序(get、set)
- JavaBean分为两类:
- 实体类Bean:存储业务数据,例如Student、Emp、User等
- 业务处理Bean:处理业务逻辑和数据访问(Service 和 Dao)
- JavaBean:一个遵循特定写法的Java类,其它程序可以通过反射实例化JavaBean对象
- View:负责模型的展示,一般指用户界面
- Controller:接收用户请求并委托给模型处理(查询数据、改变数据状态),把模型返回的数据返回给视图——取得表单数据、调用业务逻辑、转向指定页面
- Model:数据模型,提供要展示的数据。例如JavaBean组件(包含数据和行为)——模型数据查询和模型数据更新等功能
工作流程:用户通过视图层发送请求到服务器,在服务器中请求被Controller接收,Controller 调用相应的Model层处理请求,处理完毕将结果返回到Controller,Controller再根据请求处理的结果 找到相应的View视图,渲染数据后响应给浏览器
基于Servlet的MVC模式
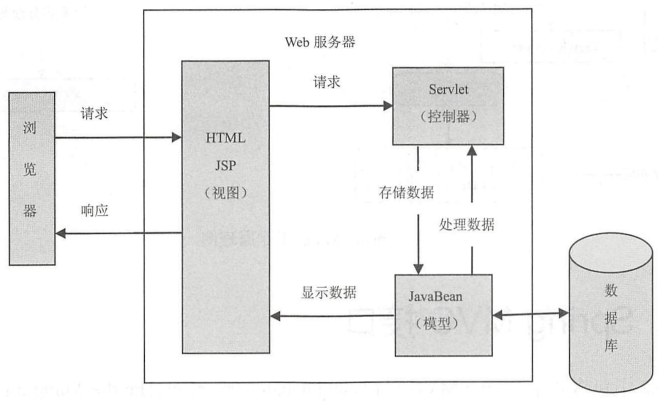
- 模型:一个或者多个JavaBean对象
- 视图:一个或者多个JSP页面。JSP主要使用html和javabean来显示数据
- 控制器:一个或者多个Servlet对象,将请求转发给处理业务逻辑的JavaBean,将处理结果放到JavaBean中,输出给视图显示
- JSP:一种Java servlet,主要用于实现Java web应用程序的用户界面部分
- Servlet:运行在 Web 服务器或应用服务器上的程序,作为请求和数据库(其他应用程序)的中间层(所有 Servlet 功能都是通过一个名为
Servlet的接口向外暴露的,HttpServlet 抽象类实现了 Servlet 接口的很多常用功能)
MVC框架的任务:
- 将url映射到java类或java类的方法
- 封装用户提交的数据
- 处理请求–调用相关的业务处理–封装响应数据
- 渲染响应的数据(JSP/HTML等)
SpringMVC
Spring 为表述层开发提供的一整套的解决方案
以请求为驱动,可配置,包含多种视图技术——SpringMVC不关心使用的视图技术
三层架构:
- 表述层(或表示层,Web层)、业务逻辑层(Service)、数据访问层(持久层,Dao)
- 表述层包括前台页面和后台 servlet,即展示层和控制层,展示层负责结果的展示,控制层负责接收请求——通过前端控制器DispatcherServlet,对请求和响应进行统一处理
- 业务层:事务放到业务层来控制
- 数据访问层:包括数据层(即数据库)和数据访问层,和数据库交互
- 表述层:SpringMVC;业务层:Spring;持久层:MyBatis
DispatcherServlet:前端控制器,配置在web.xml文件中
- 协调和组织不同组件完成请求处理并返回响应工作
- 继承自 HttpServlet,是 SpringMVC 的入口,所有的请求都通过它
- 根据自己定义的具体规则拦截匹配的请求,分发到目标 Controller 来处理。初始化 DispatcherServlet时,框架在web应用程序WEB-INF目录中寻找一个名为[servlet名称]-servlet.xml的文件,并定义相关的Beans,重写在全局中定义的任何Beans
HandlerMapping:映射处理器,通过配置文件或注解找到Web请求路径对应的Handler
Handler:处理器,开发人员编写,处理器中完成业务逻辑功能
HandlerAdapter:处理器适配器。Handler有多种实现类型,适配器模式将具有类似功能但无共同父类的类定义统一的访问接口。HandlerAdapter是SpringMVC中Handler的访问接口
ViewResolver:视图解析器。解析多种视图(JSP等)
ModelAndView:封装了Model和View对象
请求处理的流程:

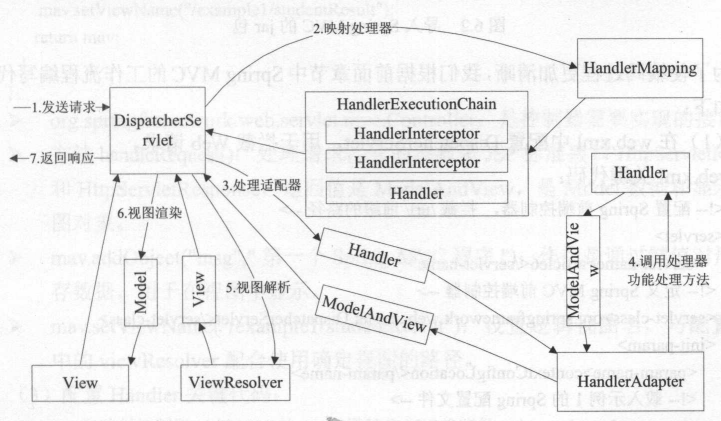
- Tomcat 启动,对 DispatcherServlet 实例化,调用 DispatcherServlet 的 init() 初始化,初始化中完成:对 web.xml 中初始化参数的加载;建立 WebApplicationContext(SpringMVC的IOC容器);进行组件的初始化
- 客户端发出请求,Tomcat 接收这个请求,如果匹配 DispatcherServlet 在 web.xml 中配置的映射路径,Tomcat 将请求转交给 DispatcherServlet 处理
- DispatcherServlet 从 SpringMVC 的 IOC 容器中取出所有 HandlerMapping 实例(每个实例对应一个 HandlerMapping 接口的实现类)并遍历,每个 HandlerMapping 会根据请求信息,通过相应实现类中的方式去找到处理该请求的 Handler(执行程序,如 Controller 中的方法),并且将这个 Handler 与一堆 HandlerInterceptor (拦截器)封装成一个 HandlerExecutionChain 对象。一旦有一个 HandlerMapping 可以找到 Handler则退出遍历
- DispatcherServlet 取出 HandlerAdapter 组件,根据已经找到的 Handler,从所有HandlerAdapter 中找到可以处理该 Handler 的 HandlerAdapter 对象
- 执行 HandlerExecutionChain 中所有拦截器的 preHandler(),再利用 HandlerAdapter 执行 Handler ,执行完成得到 ModelAndView,再依次调用拦截器的 postHandler();
- 利用 ViewResolver 将 ModelAndView 或是 Exception (可解析成 ModelAndView) 解析成 View,View 会调用 render() 再根据 ModelAndView 中的数据渲染出页面;
- 最后依次调用拦截器的 afterCompletion(),请求结束
基本范例
导入依赖:
1
2
3
4
5
6
7
8
9
10
11
12
13
14
15
16
17
18
19
20
21
22
23
24
25
26
27
28
29
30
31
32
33
34
<!--打包为web项目,此时会自动创建web.xml-->
<packaging>war</packaging>
<dependencies>
<!-- SpringMVC -->
<dependency>
<groupId>org.springframework</groupId>
<artifactId>spring-webmvc</artifactId>
<version>5.2.14.RELEASE</version>
</dependency>
<!-- 日志 -->
<dependency>
<groupId>ch.qos.logback</groupId>
<artifactId>logback-classic</artifactId>
<version>1.2.3</version>
</dependency>
<!-- ServletAPI -->
<dependency>
<groupId>javax.servlet</groupId>
<artifactId>javax.servlet-api</artifactId>
<version>3.1.0</version>
<scope>provided</scope>
</dependency>
<!-- Spring5和Thymeleaf整合包 -->
<!--Thymeleaf: 一个服务器模板引擎。和Vue相比,Vue能够实现前后端完全分离,SpringMVC + Thymeleaf不是前后端完全分离的-->
<dependency>
<groupId>org.thymeleaf</groupId>
<artifactId>thymeleaf-spring5</artifactId>
<version>3.0.12.RELEASE</version>
</dependency>
</dependencies>- Thymeleaf是服务器端的模板引擎,在服务器端获取模板和数据,生成结果输出给浏览器呈现结果。和Vue等前端框架相比,Thymeleaf没有实现前后端完全分离
配置web.xml
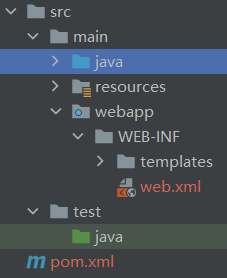
通过IDEA的Project Structure导入Web项目结构
配置web.xml:
1
2
3
4
5
6
7
8
9
10
11
12
13
14
15
16
17
18
19
20
21
22
23
<web-app xmlns="http://xmlns.jcp.org/xml/ns/javaee"
xmlns:xsi="http://www.w3.org/2001/XMLSchema-instance"
xsi:schemaLocation="http://xmlns.jcp.org/xml/ns/javaee http://xmlns.jcp.org/xml/ns/javaee/web-app_4_0.xsd"
version="4.0">
<servlet>
<servlet-name>SpringMVC_demo</servlet-name>
<servlet-class>org.springframework.web.servlet.DispatcherServlet</servlet-class>
<!-- 通过初始化参数指定SpringMVC配置文件的位置和名称 -->
<init-param>
<!-- contextConfigLocation为固定值 -->
<param-name>contextConfigLocation</param-name>
<param-value>classpath:SpringMVC_demo.xml</param-value>
</init-param>
<!--启动过程中有大量的初始化操作要做,将启动控制DispatcherServlet的初始化时间提前到服务器启动时,而非第一次请求时-->
<load-on-startup>1</load-on-startup>
</servlet>
<servlet-mapping>
<servlet-name>SpringMVC_demo</servlet-name>
<url-pattern>/</url-pattern>
</servlet-mapping>
</web-app>标签中使用
/和/*的区别/所匹配的请求可以是/login或.html或.js或.css方式的请求路径,不能匹配.jsp请求路径的请求,避免在访问jsp页面时该请求被DispatcherServlet处理/*能够匹配所有请求。在使用过滤器时,若需要对所有请求进行过滤,需要使用/*
创建请求控制器:
1
2
3
4
5
6
7
8
9
10
11
12
13
14
15
16
17
package Controller;
import org.springframework.stereotype.Controller;
import org.springframework.web.bind.annotation.RequestMapping;
public class HelloController {
public String protal(){
//将逻辑视图返回
return "index";
}
public String hello(){
return "success";
}
}- 由于SpringMVC已经封装了servlet,因此不需要显式地继承servlet接口,所有的请求都已经通过web.xml中配置的DispatcherServlet接收和分发,请求的具体处理需要通过请求控制器(通过@Controller注解来表明该Pojo为一个请求控制器)来进行处理
- 处理请求的方法需要返回字符串类型的视图名称,该视图名称会被视图解析器解析,加上前缀和后缀组成视图的路径。通过Thymeleaf对视图进行渲染,最终转发到视图所对应页面——由于这里是在服务器端渲染,因此是转发。重定向的实现见后文
配置SpringMVC.xml:该文件在DispatcherServlet初始化时自动加载,因此该文件需要在固定的位置、有固定的名字
默认的位置:WEB-INF下;默认名称:<servlet-name>-servlet.xml(servlet-name为web.xml中<servlet-name>的值,上面的结果为
SpringMVC_demo-servlet.xml)可以通过web.xml中
<init-param>标签进行配置,重新指定它的位置和名称(根据上面的表述,应当是resources下的SpringMVC_demo.xml)1
2
3
4
5
6
7
8
9
10
11
12
13
14
15
16
17
18
19
20
21
22
23
24
25
26
27
28
29
30
31
32
33
34
35
36
37
38
39
40
41
42
43
44
45
46
47
48
49
50
51
52
53
54
55
<beans xmlns="http://www.springframework.org/schema/beans"
xmlns:mvc="http://www.springframework.org/schema/mvc"
xmlns:xsi="http://www.w3.org/2001/XMLSchema-instance"
xmlns:context="http://www.springframework.org/schema/context"
xsi:schemaLocation="http://www.springframework.org/schema/beans
http://www.springframework.org/schema/beans/spring-beans.xsd
http://www.springframework.org/schema/context
https://www.springframework.org/schema/context/spring-context.xsd
http://www.springframework.org/schema/mvc
http://www.springframework.org/schema/mvc/spring-mvc.xsd">
<!--扫描控制层组件-->
<context:component-scan base-package="Controller"></context:component-scan>
<!-- 配置Thymeleaf视图解析器 -->
<bean id="viewResolver" class="org.thymeleaf.spring5.view.ThymeleafViewResolver">
<property name="order" value="1"/>
<property name="characterEncoding" value="UTF-8"/>
<property name="templateEngine">
<bean class="org.thymeleaf.spring5.SpringTemplateEngine">
<property name="templateResolver">
<bean class="org.thymeleaf.spring5.templateresolver.SpringResourceTemplateResolver">
<!-- 视图前缀 -->
<!--模板的位置-->
<property name="prefix" value="/WEB-INF/templates/"/>
<!-- 视图后缀 -->
<property name="suffix" value=".html"/>
<property name="templateMode" value="HTML5"/>
<property name="characterEncoding" value="UTF-8"/>
</bean>
</property>
</bean>
</property>
</bean>
<!--访问静态资源,例如图片、视频、jsp等-->
<mvc:default-servlet-handler/>
<!-- 开启mvc注解驱动 -->
<mvc:annotation-driven>
<mvc:message-converters>
<!-- 处理响应中文内容乱码 -->
<bean class="org.springframework.http.converter.StringHttpMessageConverter">
<property name="defaultCharset" value="UTF-8"/>
<property name="supportedMediaTypes">
<list>
<value>text/html</value>
<value>application/json</value>
</list>
</property>
</bean>
</mvc:message-converters>
</mvc:annotation-driven>
</beans><mvc:default-servlet-handler/>:在SpringMVC上下文中定义一个org.springframework.web.servlet.resource.DefaultServletHttpRequestHandler,它会对进入DispatcherServlet的URL进行筛查,如果发现是静态资源请求,就将该请求转由Web服务器(Tomcat)默认的Servlet处理,如果不是静态资源请求,才由DispatcherServlet继续处理——静态资源访问是通过url直接去定位资源,中间不需要繁琐的解析操作如果是多个模板路径,则为如下的配置。此时,WEB-INF下有多个模板文件夹:templates和templates/RequestMapping
1
2
3
4
5
6
7
8
9
10
11
12
13
14
15
16
17
18
19
20
21
22
23
24
25
26
27
28
29
30
31
32
33
34
35<!-- 配置Thymeleaf视图解析器 -->
<bean id="viewResolver" class="org.thymeleaf.spring5.view.ThymeleafViewResolver">
<property name="order" value="1"/>
<property name="characterEncoding" value="UTF-8"/>
<property name="templateEngine">
<bean class="org.thymeleaf.spring5.SpringTemplateEngine">
<!--这里引入多个模板路径,因此需要用templateResolvers!Controller中返回的字符串照常即可-->
<property name="templateResolvers">
<set>
<bean class="org.thymeleaf.spring5.templateresolver.SpringResourceTemplateResolver">
<!-- 视图前缀 -->
<!--模板的位置-->
<property name="prefix" value="/WEB-INF/templates/"/>
<!-- 视图后缀 -->
<property name="suffix" value=".html"/>
<property name="templateMode" value="HTML5"/>
<property name="characterEncoding" value="UTF-8"/>
<property name="checkExistence" value="true"/>
</bean>
<bean class="org.thymeleaf.spring5.templateresolver.SpringResourceTemplateResolver">
<!-- 视图前缀 -->
<!--模板的位置-->
<property name="prefix" value="/WEB-INF/templates/RequestMapping/"/>
<!-- 视图后缀 -->
<property name="suffix" value=".html"/>
<property name="templateMode" value="HTML5"/>
<property name="characterEncoding" value="UTF-8"/>
<property name="checkExistence" value="true"/>
</bean>
</set>
</property>
</bean>
</property>
</bean>
配置Tomcat(预先安装tomcat8.5)
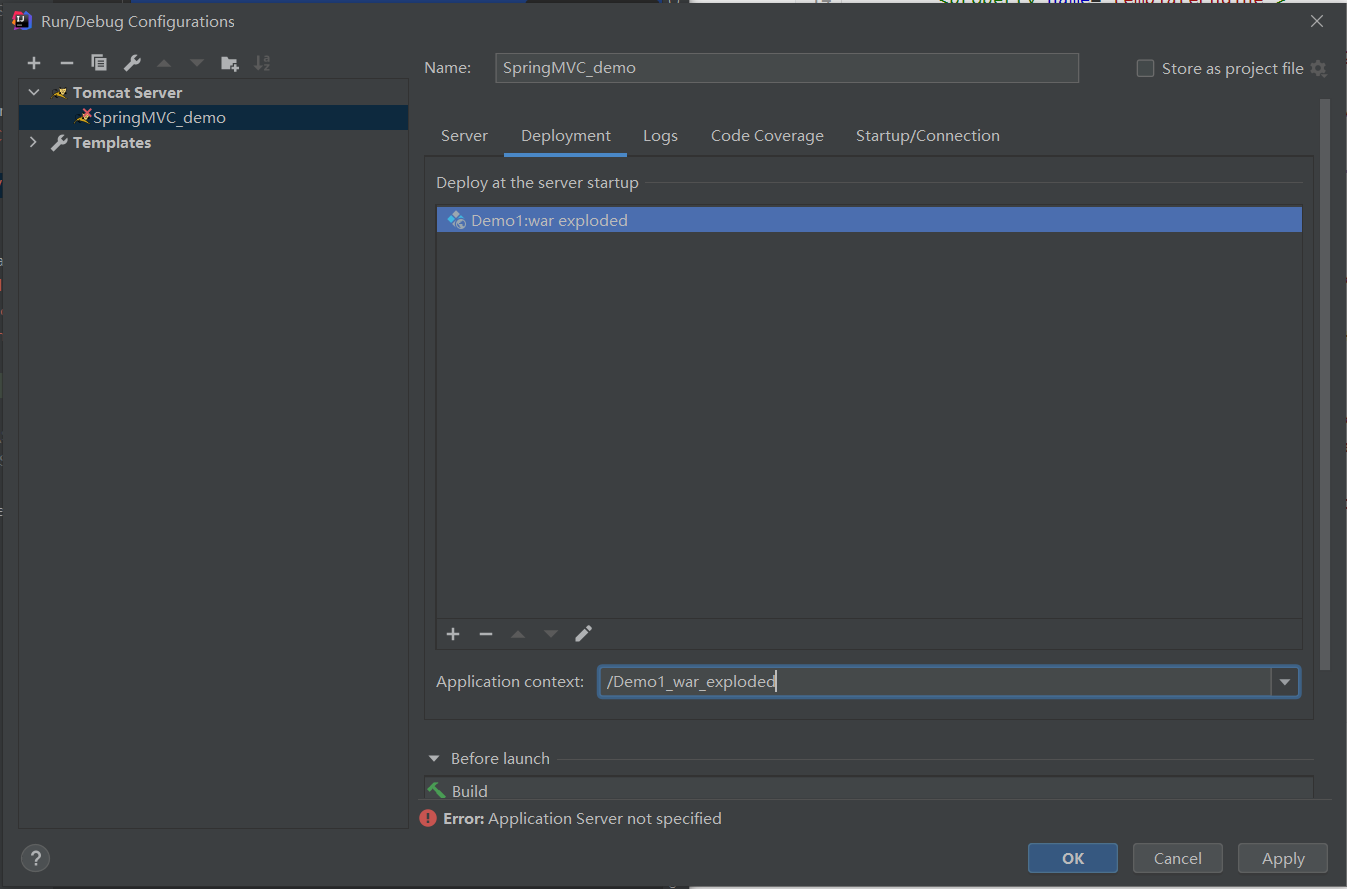
/Demo1_war_exploded:工程的上下文路径
使用SpringMVC必须配置的三大件: 处理器映射器、处理器适配器、视图解析器。通常只需要手动配置视图解析器,处理器映射器和处理器适配器只需要开启注解驱动即可
RequestMapping注解
- 将请求和处理请求的控制器方法关联起来,建立映射关系。SpringMVC 接收到指定的请求则找相应的控制器方法处理这个请求
注解的位置
标识一个类:设置映射请求的请求路径的初始信息
标识一个方法:设置映射请求的请求路径的具体信息
下例的请求路径为
/requestMapping/location1
2
3
4
5
6
7
8
public class TestRequestMapping {
public String testLocation() {
// 测试在类上标注@RequestMapping
return "testLocation";
}
}
注解的属性
@RequestMapping注解的value属性:
通过请求地址匹配请求映射——value属性是一个字符串类型的数组,表示该请求映射能够匹配多个请求地址所对应的请求
这表明多个请求会由一个控制器方法处理
1
2
3
4
5
public String testValue() {
// 测试@RequestMapping的Value属性
return "testValue";
}
@RequestMapping注解的method属性:
通过请求的请求方式(get或post)匹配请求映射
method属性是一个RequestMethod类型数组,该请求映射能够匹配多种请求方式的请求。若当前请求的地址满足value但请求方式不满足method,则浏览器报错 405:Request method ‘POST’ not supported
SpringMVC提供@RequestMapping的派生注解
- 处理get请求的映射:@GetMapping
- 处理post请求的映射:@PostMapping
- 处理put请求的映射:@PutMapping
- 处理delete请求的映射:@DeleteMapping
若要发送put和delete请求,则需要通过spring提供的过滤器HiddenHttpMethodFilter(见后文RESTful)
1
2
3
4
5
6
7//<form th:action="@{/requestMapping/method}" method="post"> <!--提交时跳转到该页面-->
// <input type="submit">
//</form>
public String testMethod() {
return "testMethod";
}
@RequestMapping注解的params属性:
通过请求的请求参数匹配请求映射
params属性是一个字符串类型的数组,通过四种表达式设置请求参数和请求映射的匹配关系
- “param”:匹配的请求必须携带param请求参数
- “!param”:匹配的请求必须不能携带param请求参数
- “param=value”:匹配的请求必须携带param请求参数,且param=value
- “param!=value”:匹配的请求必须携带param请求参数,且param!=value
若不满足params属性,则页面报错400
1
2
3
4
5
6//<a th:href="@{/requestMapping/params(username='admin',password=123456)}">测试@RequestMapping的params属性</a><br>
public String testParams() {
// 必须包含username(不包含为!username),password必须不是123456
return "testParams";
}
@RequestMapping注解的headers属性:
- 通过请求的请求头信息匹配请求映射
- headers属性是一个字符串类型的数组,通过四种表达式设置请求头信息和请求映射的匹配关系
- “header”:匹配的请求必须携带header请求头信息
- “!header”:匹配的请求必须不能携带header请求头信息
- “header=value”:匹配的请求必须携带header请求头信息,且header=value
- “header!=value”:匹配的请求必须携带header请求头信息,且header!=value
- 若请求满足@RequestMapping注解的value和method属性,但不满足headers属性,页面显示404错误,资源未找到
ant风格的路径:
- ?:任意的单个字符
- *:任意的0个或多个字符
- **:任意层数的任意目录
路径中的占位符:
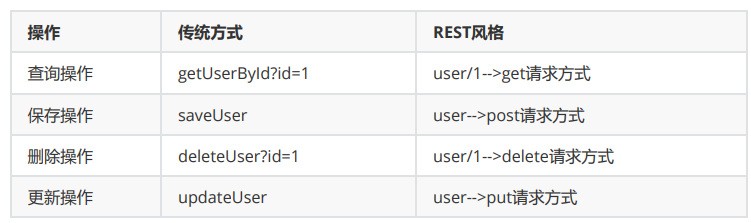
原始方式:/deleteUser?id=1;REST方式:/deleteUser/1
请求某些数据通过路径的方式传输到服务器中,可以在@RequestMapping注解的value属性中通过占位符
{xxx}表示传输的数据。通过@PathVariable注解,将占位符所表示的数据赋给控制器方法的形参1
2
3
4
5
6//<a th:href="@{/requestMapping/placeholder/1/admin}">测试路径中的占位符-->/testRest</a><br>
public String testRest( String id, String username){
System.out.println("id:"+id+",username:"+username);
return "testPlaceholder";
}
获取参数
通过ServletAPI获取
将HttpServletRequest作为控制器方法的形参,该参数为封装了当前请求报文的对象
1
2
3
4
5
6
7
8
9
10
11
12
13
14/*<form th:action="@{/params/servletApi}" method="post">
用户名:<input type="text" name="username"><br>
密码:<input type="password" name="password"><br>
<input type="submit" value="登录"><br>
</form>*/
public String testServletApi(HttpServletRequest request) {
// 测试ServletAPI获取请求参数
// 获取request对象
HttpSession session = request.getSession();
String username = request.getParameter("username"); // 参数名为index.html中相应的字段名
String password = request.getParameter("password");
return "testServletApi";
}
通过控制器方法的形参获取请求参数
5个方式
形参和请求参数同名
1
2
3
4
5
6
7
public String testParams(String username, String password) {
// 测试使用方法参数获取请求参数
// 要求形参名 = 请求参数名
System.out.println(username + " " + password);
return "testParams";
}- 若有多个同名的请求参数,形参设置为字符串数组 / 字符串
- 字符串数组:数组中包含了每一个数据
- 字符串:每个数据之间使用逗号拼接
- 若有多个同名的请求参数,形参设置为字符串数组 / 字符串
@RequestParam:请求参数和形参创建映射关系
属性:
- value:指定为形参赋值的请求参数名
- required:设置是否必须传输此请求参数,默认值为true;若没有传输该请求参数,且没有设置defaultValue属性,则页面报错400
- defaultValue:当value所指定的请求参数没有传输或传输的值为””时,设置为默认值
1
2
3
4
5
6
7
8
public String testRequestParam( String name,
String password) {
// @RequestParam获取请求参数
// 要求形参名 = 请求参数名
System.out.println(name + " " + password);
return "testRequestParam";
}
@RequestHeader:请求头信息和形参创建映射关系,属性同上(获取请求头里的字段信息),用得很少
1
2
3
4
5
6
public String testHeader( String refer) {
// RequestHeader获取请求参数
System.out.println(refer);
return "testHeader";
}@CookieValue:cookie数据和形参创建映射关系,属性同上(获取cookie里的字段信息),用得很少
1
2
3
4
5
6
public String testCookie( String sessionId) {
// 测试RequestHeader获取请求参数
System.out.println(sessionId);
return "testCookie";
}通过POJO获取请求参数:形参设置一个POJO,若请求参数的参数名和实体类的属性名一致,则属性被赋值为请求参数值——注意,是属性(有get、set方法的),而不是成员变量
1
2
3
4
5
6
7
public String testPojo(User user) {
// 测试Pojo获取请求参数
// username, password
System.out.println(user);
return "testPojo";
}
请求参数的乱码问题
使用SpringMVC提供的编码过滤器CharacterEncodingFilter(必须在web.xml中注册)
1
2
3
4
5
6
7
8
9
10
11
12
13
14
15
16
17
18<filter>
<filter-name>CharacterEncodingFilter</filter-name>
<filter-class>org.springframework.web.filter.CharacterEncodingFilter</filter-class>
<init-param>
<param-name>encoding</param-name>
<param-value>UTF-8</param-value>
</init-param>
<init-param>
<param-name>forceEncoding</param-name>
<param-value>true</param-value>
</init-param>
</filter>
<filter-mapping>
<filter-name>CharacterEncodingFilter</filter-name>
<url-pattern>/*</url-pattern>
</filter-mapping>
<servlet>...处理编码的过滤器一定要配置到其他过滤器之前
域共享数据
域对象:主要用在web应用中,负责存储数据(通俗的讲,这个对象本身可以存储一定范围内的所有数据)
- 可以在不同的Servlet中进行数据传递的对象称为域对象
- 域对象的数据以key-value形式存储
- 都有如下方法:
setAttribute(name, value):存储数据getAttribute(name)removeAttribute(name)
- 四个域
- page(PageContextImpl):当前jsp页面范围内有效
- request(HttpServletRequest):一次请求响应范围有效,同一客户端的不同请求,无法获取域对象中的值
- session(HttpSession):一次会话范围有效,同一客户端在一次会话内的多个请求,都可以获取到session域内的值;可以看成一次浏览器关闭
- application(ServletContext):一次应用程序范围;可以看成一次服务器关闭
使用ServletAPI向request域对象共享数据:略,只需要设置一个形参HttpServletRequest request即可
使用ModelAndView向request域对象共享数据:官方推荐
Model:向request域共享数据;View:设置逻辑视图,实现页面跳转
实际上,之前的控制器方法返回逻辑视图(字符串)之后,都会被封装为ModelAndView对象
1
2
3
4
5
6
7
8
9
10
11
12
13
14
public class TestScope {
public ModelAndView testModelAndView() {
// ModelAndView向request域共享数据
ModelAndView mav = new ModelAndView();
//向request域域共享数据
mav.addObject("testScope", "hello, ModelAndView");
//设置视图,实现页面跳转
mav.setViewName("testModelAndView");
return mav;
}
}ModelAndView中的key-value对,将用于在相应View模板(这里为testModelAndView.html,模板的具体路径需要加上SpringMVC.xml中定义的前缀和后缀)中填充相应位置,进行渲染
1
2
3
4
5
6
7
8
9
10
11
<html lang="en" xmlns:th="http://www.thymeleaf.org">
<head>
<meta charset="UTF-8">
<title>Scope_MandV</title>
</head>
<body>
<h1>Scope_ModelAndView</h1>
<p th:text="${testScope}"></p>
</body>
</html>
使用map向request域对象共享数据:key-value以相同方式被渲染;这里需要设置形参为 Map 类型
1
2
3
4
5
6
public String testMap(Map<String, Object> map){
// Map向request域对象共享数据
map.put("testMap", "hello, Map");
return "testMap";
}使用ModelMap向request域对象共享数据:这里需要设置形参为 ModelMap 类型
1
2
3
4
5
6
public String testModelMap(ModelMap modelMap){
// ModelMap向request域对象共享数据
modelMap.addAttribute("testModelMap", "hello, ModelMap");
return "testModelMap";
}Model、ModelMap、Map的关系:Model、ModelMap、Map类型的参数本质上都是 BindingAwareModelMap 类型
为什么ModelAndView可以new,但Model、Map、ModelMap需要为形式参数?
向session域共享数据(直接用serlvet的api),此时相应模板位置为
<p th:text="${session.testSessionScope}"></p>1
2
3
4
5
6
public String testSession(HttpSession session){
// 向session域共享数据
session.setAttribute("testSessionScope", "hello,session");
return "testSession";
}- 注意session的钝化和活化
向application域共享数据(直接用serlvet的api),此时相应模板位置为
<p th:text="${application.testApplicationScope}"></p>1
2
3
4
5
6
7
public String testApplication(HttpSession session){
// 向application域共享数据
ServletContext application = session.getServletContext();
application.setAttribute("testApplicationScope", "hello,application");
return "testApplication";
}以上的返回值,都会被封装到一个ModelAndView对象中
SpringMVC的视图
- SpringMVC中的视图是View接口,渲染数据,将Model中的数据展示给用户
- 若使用的视图技术为Thymeleaf,在SpringMVC的配置文件中配置了Thymeleaf的视图解析器,通过该解析器解析得到的是ThymeleafView
ThymeleafView
当控制器方法中设置的视图名称没有任何前缀时,会被SpringMVC配置文件中的视图解析器解析,最终路径为视图前缀 + 视图名称 + 视图后缀,通过转发的方式实现跳转
1
2
3
4
public String testThymeleafView(){
return "testThymeleaf";
}
转发视图
SpringMVC中默认的转发视图是InternalResourceView
当控制器方法中所设置的视图名称以”forward:”为前缀时,创建InternalResourceView视图。该视图名称不会被SpringMVC配置文件中的视图解析器解析,而将前缀”forward:”去掉,剩余部分作为最终路径,通过转发的方式实现跳转
1
2
3
4
public String testInternalResourceView(){
return "forward:/test/model";
}
重定向视图
SpringMVC中默认的重定向视图是RedirectView
当控制器方法中所设置的视图名称以”redirect:”为前缀时,创建RedirectView视图。该视图视图名称不会被SpringMVC配置文件中的视图解析器解析,而将前缀”redirect:”去掉,剩余部分作为最终路径,通过重定向的方式实现跳转
这里重定向的时候,会自动为最终路径添加上下文路径(localhost:8080/…/)
1
2
3
4
public String testRedirectView(){
return "redirect:/test/model";
}这里转发视图和重定向视图的返回值,为一个新的请求路径(url)
视图控制器
如果一个控制器方法只是用来实现页面跳转,即只需要返回视图名称,没有其他业务逻辑时,可以在SpringMVC配置文件中view-controller标签来替代
1
2
3
4
5<!--
path:设置处理的请求地址
view-name:设置请求地址所对应的视图名称
-->
<mvc:view-controller path="/" view-name="index"></mvc:view-controller>注意,此时其他控制器的请求映射将全部失效,需要在SpringMVC配置文件中再添加开启mvc注解驱动的标签:
<mvc:annotation-driven />
小结
- 这四章所记录的内容都与控制器方法相关。RequestMapping决定了使用哪一个控制器方法,传入参数使得用户填入的表单数据能够发送到服务器,域共享数据使得服务器的处理结果能够返回到用户页面进行渲染,SpringMVC视图则记录了不同的页面跳转方式(转发、重定向)
RESTful
RESTful
REST:Representational State Transfer,表现层资源状态转移。一种看待服务器的方式
将服务器看作是由很多离散的资源(图片、数据库的表等)组成,一个资源由一个或多个URI来标识。URI是资源的名称,也是资源在Web上的地址。客户端应用通过资源的URI与其进行交互
资源的表述:一段对于资源在某个特定时刻状态的描述。可以在客户端-服务器端之间转移(交换)
- 可以有多种格式,例如HTML/XML/JSON/纯文本/图片/视频/音频等
- 资源的表述格式可以通过协商机制来确定
状态转移:在客户端和服务器端之间转移(transfer)代表资源状态的表述。通过转移和操作资源的表述,间接实现操作资源
HTTP 协议里四个表示操作方式的动词:GET、POST、PUT、DELETE
- 分别对应四种基本操作:GET获取资源、POST新建资源、PUT更新资源、DELETE删除资源
- REST 风格提倡 URL 地址使用统一的风格设计,从前到后各个单词使用斜杠分开,不使用问号键值对的方式携带请求参数,而将发给服务器的数据作为 URL 地址的一部分
- 不去考虑到底对资源做什么操作,只关注请求什么资源(即,请求路径是什么)
HiddenHttpMethodFilter
浏览器只支持发送get和post方式的请求
SpringMVC 提供 HiddenHttpMethodFilter 将 POST 请求转换为 DELETE 或 PUT 请求
HiddenHttpMethodFilter 处理 put 和 delete 请求的条件:
- 当前请求的请求方式必须为post
- 当前请求必须传输请求参数
_method
HiddenHttpMethodFilter 过滤器将当前请求的请求方式转换为请求参数
_method的值,即_method是最终的请求方式在web.xml中注册HiddenHttpMethodFilter
1
2
3
4
5
6
7
8
9<!--注册HiddenHttpMethodFilter-->
<filter>
<filter-name>HiddenHttpMethodFilter</filter-name>
<filter-class>org.springframework.web.filter.HiddenHttpMethodFilter</filter-class>
</filter>
<filter-mapping>
<filter-name>HiddenHttpMethodFilter</filter-name>
<url-pattern>/*</url-pattern>
</filter-mapping>1
2
3
4<form th:action="@{/user}" method="post">
<input type="submit" value="登录"><br>
<input type="hidden" name="_method" value="put"><br>
</form>必须先注册 CharacterEncodingFilter,因为 CharacterEncodingFilter 通过 request.setCharacterEncoding(encoding) 设置字符集,该方法要求前面不能有任何获取请求参数的操作,而 HiddenHttpMethodFilter 有一个获取参数
_method的操作
范例
配置:
web.xml
1
2
3
4
5
6
7
8
9
10
11
12
13
14
15
16
17
18
19
20
21
22
23
24
25
26
27
28
29
30
31
32
33
34
35
36
37
38
39
40
41
42
43
44
45
46
47
48
<web-app xmlns="http://xmlns.jcp.org/xml/ns/javaee"
xmlns:xsi="http://www.w3.org/2001/XMLSchema-instance"
xsi:schemaLocation="http://xmlns.jcp.org/xml/ns/javaee http://xmlns.jcp.org/xml/ns/javaee/web-app_4_0.xsd"
version="4.0">
<!--配置springMVC的编码过滤器-->
<filter>
<filter-name>CharacterEncodingFilter</filter-name>
<filter-class>org.springframework.web.filter.CharacterEncodingFilter</filter-class>
<init-param>
<param-name>encoding</param-name>
<param-value>UTF-8</param-value>
</init-param>
<init-param>
<param-name>forceEncoding</param-name>
<param-value>true</param-value>
</init-param>
</filter>
<filter-mapping>
<filter-name>CharacterEncodingFilter</filter-name>
<url-pattern>/*</url-pattern>
</filter-mapping>
<!--注册HiddenHttpMethodFilter-->
<filter>
<filter-name>HiddenHttpMethodFilter</filter-name>
<filter-class>org.springframework.web.filter.HiddenHttpMethodFilter</filter-class>
</filter>
<filter-mapping>
<filter-name>HiddenHttpMethodFilter</filter-name>
<url-pattern>/*</url-pattern>
</filter-mapping>
<servlet>
<servlet-name>SpringMVC</servlet-name>
<servlet-class>org.springframework.web.servlet.DispatcherServlet</servlet-class>
<init-param>
<param-name>contextConfigLocation</param-name>
<param-value>classpath:SpringMVC.xml</param-value>
</init-param>
<load-on-startup>1</load-on-startup>
</servlet>
<servlet-mapping>
<servlet-name>SpringMVC</servlet-name>
<url-pattern>/</url-pattern>
</servlet-mapping>
</web-app>SpringMVC.xml
1
2
3
4
5
6
7
8
9
10
11
12
13
14
15
16
17
18
19
20
21
22
23
24
25
26
27
28
29
30
31
32
33
34
35
36
37
38
39
40
41
42
43
44
45
46
47
48
49
50
51
<beans xmlns="http://www.springframework.org/schema/beans"
xmlns:mvc="http://www.springframework.org/schema/mvc"
xmlns:xsi="http://www.w3.org/2001/XMLSchema-instance"
xmlns:context="http://www.springframework.org/schema/context"
xsi:schemaLocation="http://www.springframework.org/schema/beans
http://www.springframework.org/schema/beans/spring-beans.xsd
http://www.springframework.org/schema/context
https://www.springframework.org/schema/context/spring-context.xsd
http://www.springframework.org/schema/mvc
http://www.springframework.org/schema/mvc/spring-mvc.xsd">
<context:component-scan base-package="Controller"/>
<context:component-scan base-package="Dao"/>
<!-- 配置Thymeleaf视图解析器 -->
<bean id="viewResolver" class="org.thymeleaf.spring5.view.ThymeleafViewResolver">
<property name="order" value="1"/>
<property name="characterEncoding" value="UTF-8"/>
<property name="templateEngine">
<bean class="org.thymeleaf.spring5.SpringTemplateEngine">
<!--这里引入多个模板路径,因此需要用templateResolvers!Controller中返回的字符串照常即可-->
<property name="templateResolvers">
<set>
<bean class="org.thymeleaf.spring5.templateresolver.SpringResourceTemplateResolver">
<!-- 视图前缀 -->
<!--模板的位置-->
<property name="prefix" value="/WEB-INF/templates/"/>
<!-- 视图后缀 -->
<property name="suffix" value=".html"/>
<property name="templateMode" value="HTML5"/>
<property name="characterEncoding" value="UTF-8"/>
<property name="checkExistence" value="true"/>
</bean>
</set>
</property>
</bean>
</property>
</bean>
<!--使用默认的servlet处理静态资源-->
<!--当前dispatcherServlet的urlpattern为/,无法处理静态资源-->
<!--因此需要此配置,此时请求会先由dispatcherServlet处理-->
<mvc:default-servlet-handler />
<!--开启注解驱动-->
<mvc:annotation-driven />
<!--视图控制器-->
<!--<mvc:view-controller path="/" view-name="index"/>-->
</beans>
实体类
1
2
3
4
5
6
7
8
9
10
11
12
13
14
15
16
17
18
19
20
21
22
23
24
25
26
27
28
29
30
31
32
33
34
35
36
37
38
39
40
41
42
43
44
45
46
47
48
49
50
51
52
53
54
55
56
57
58
59
60package Pojo;
public class Emp {
private Integer id;
private String name;
private String email;
private Integer gender; //male:1, female:0
public Emp() {}
public Emp(Integer id, String name, String email, Integer gender) {
this.id = id;
this.name = name;
this.email = email;
this.gender = gender;
}
public void setId(Integer id) {
this.id = id;
}
public void setName(String name) {
this.name = name;
}
public void setEmail(String email) {
this.email = email;
}
public void setGender(Integer gender) {
this.gender = gender;
}
public Integer getId() {
return id;
}
public String getName() {
return name;
}
public String getEmail() {
return email;
}
public Integer getGender() {
return gender;
}
public String toString() {
return "Emp{" +
"id=" + id +
", name='" + name + '\'' +
", email='" + email + '\'' +
", gender=" + gender +
'}';
}
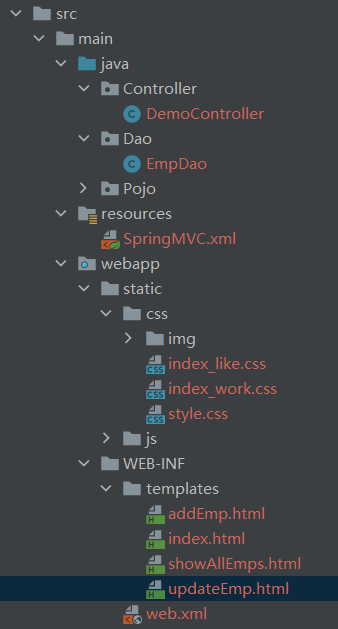
}Dao与模拟数据(这里模拟数据放到Dao中,而非数据库中的表)。SpringMVC的配置文件中,要添加对Dao、Controller包的注解扫描!(见SpringMVC.xml)
1
2
3
4
5
6
7
8
9
10
11
12
13
14
15
16
17
18
19
20
21
22
23
24
25
26
27
28
29
30
31
32
33
34
35
36
37
38
39
40
41
42
43package Dao;
import org.springframework.stereotype.Repository;
import java.util.*;
import Pojo.Emp;
public class EmpDao {
private static Map<Integer, Emp> employees = null;
static{
employees = new HashMap<Integer, Emp>();
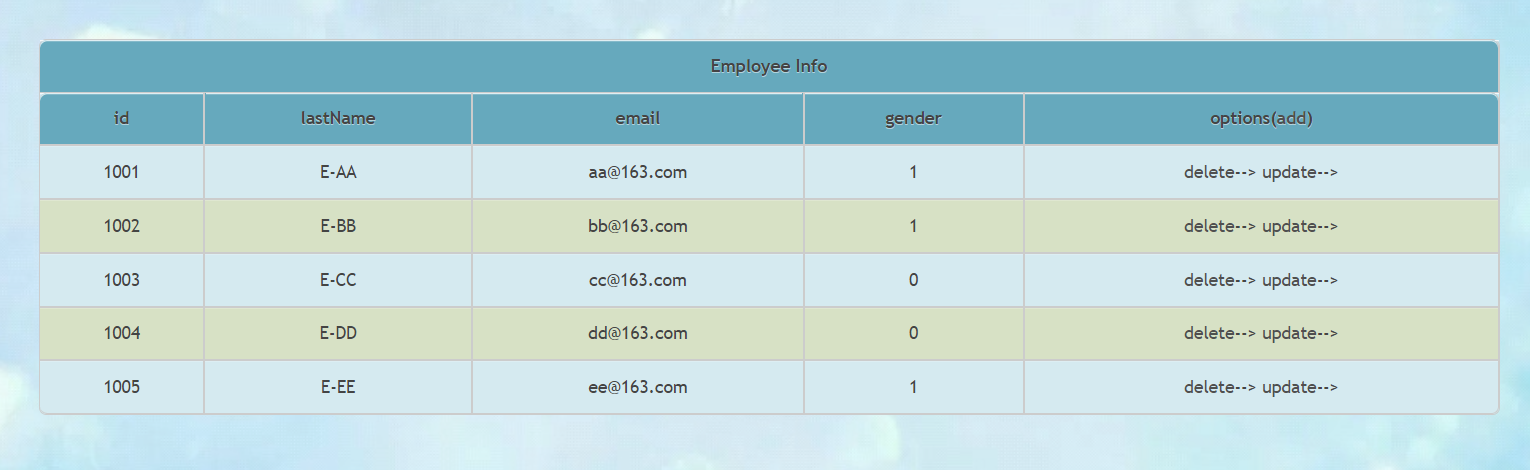
employees.put(1001, new Emp(1001, "E-AA", "aa@163.com", 1));
employees.put(1002, new Emp(1002, "E-BB", "bb@163.com", 1));
employees.put(1003, new Emp(1003, "E-CC", "cc@163.com", 0));
employees.put(1004, new Emp(1004, "E-DD", "dd@163.com", 0));
employees.put(1005, new Emp(1005, "E-EE", "ee@163.com", 1));
}
private static Integer initId = 1006;
public void save(Emp employee){
if(employee.getId() == null){
employee.setId(initId++);
}
employees.put(employee.getId(), employee);
}
public Collection<Emp> getAll(){
return employees.values();
}
public Emp get(Integer id){
return employees.get(id);
}
public void delete(Integer id){
employees.remove(id);
}
}查询:
Controller:
1
2
3
4
5
6
7
8
9
10
11
12
13
14
15
16
17
18
19
20
21
22
23
24
25
26
27
28
29
30
31
32
33
34
35package Controller;
import Dao.EmpDao;
import Pojo.Emp;
import org.springframework.beans.factory.annotation.Autowired;
import org.springframework.stereotype.Controller;
import org.springframework.web.bind.annotation.RequestMapping;
import org.springframework.web.bind.annotation.RequestMethod;
import org.springframework.web.servlet.ModelAndView;
import java.util.*;
public class DemoController {
private EmpDao empDao;
public String protal() {
return "index";
}
// 查询数据
public ModelAndView getAllData() {
Collection<Emp> empList = empDao.getAll();
ModelAndView mav = new ModelAndView();
mav.addObject("empList", empList);
mav.setViewName("showAllEmps");
return mav;
}
}Template:
index.html
1
2
3
4
5
6
7
8
<html lang="en" xmlns:th="http://www.thymeleaf.org">
<head>
<meta charset="UTF-8">
<title>首页</title>
</head>
<body>
<a th:href="@{/employee}">查询所有员工数据</a><br>
showAllEmps.html(引入css,优化页面——css为静态资源,因此需要在SpringMVC配置文件中添加
<mvc:default-servlet-handler />,静态资源请求由defaultServlet处理,而”/static/css/index_work.css“为WEB-INF同级的路径)1
2
3
4
5
6
7
8
9
10
11
12
13
14
15
16
17
18
19
20
21
22
23
24
25
26
27
28
29
30
31
32
33
<html lang="en" xmlns:th="http://www.thymeleaf.org">
<head>
<meta charset="UTF-8">
<title>EmpList</title>
<link rel="stylesheet" th:href="@{/static/css/index_work.css}">
</head>
<body>
<table border="1" cellpadding="0" cellspacing="0" style="text-align: center;" id="dataTable">
<tr>
<th colspan="5">Employee Info</th>
</tr>
<tr>
<th>id</th>
<th>lastName</th>
<th>email</th>
<th>gender</th>
<th>options(<a th:href="@{/addEmp}">add</a>)</th>
</tr>
<tr th:each="employee : ${empList}">
<td th:text="${employee.id}"></td>
<td th:text="${employee.name}"></td>
<td th:text="${employee.email}"></td>
<td th:text="${employee.gender}"></td>
<td>
<a th:href="@{'/employee/'+${employee.id}}">delete</a>-->
<a th:href="@{'/employee/'+${employee.id}}">update</a>-->
</td>
</tr>
</table>
</body>
</html>SpringMVC的配置文件添加默认servlet配置,用于处理静态资源:
1
2
3
4<!--使用默认的servlet处理静态资源-->
<!--当前dispatcherServlet的urlpattern为/,无法处理静态资源-->
<!--因此需要此配置,此时请求会先由dispatcherServlet处理-->
<mvc:default-servlet-handler />
添加:
转入添加页面:
1
2
3
4
5
6
7<!--index.html-->
<a th:href="@{/addEmp}">添加数据</a><br>
<!--showAllEmps.html-->
...
<th>options(<a th:href="@{/addEmp}">add</a>)</th>
...1
2
3
4
public String addDataRedirect() {
return "addEmp";
}添加的控制器逻辑:
1
2
3
4
5
6
public String addData(Emp employee) {
empDao.save(employee);
return "redirect:/employee";
}添加的页面:
1
2
3
4
5
6
7
8
9
10
11
12
13
14
15
16
17
<html lang="en" xmlns:th="http://www.thymeleaf.org">
<head>
<meta charset="UTF-8">
<title>添加数据</title>
<link rel="stylesheet" th:href="@{/static/css/index_work.css}">
</head>
<body>
<form th:action="@{/employee}" method="post">
name:<input type="text" name="name"><br>
email:<input type="text" name="email"><br>
gender:<input type="radio" name="gender" value="1">male
<input type="radio" name="gender" value="0">female<br>
<input type="submit" value="添加数据"><br>
</form>
</body>
</html>
更新:
转入更新页面(index.html)
1
<a th:href="@{'/employee/'+${employee.id}}">update</a>-->
更新的控制器逻辑
1
2
3
4
5
6
7
8
9
10
11
12
13
14
15
public ModelAndView updateIndex( Integer id) {
Emp update = empDao.get(id);
ModelAndView mav = new ModelAndView();
mav.addObject("emp", update);
mav.setViewName("updateEmp");
return mav;
}
public String updateData(Emp employee) {
empDao.save(employee);
return "redirect:/employee";
}更新页面
1
2
3
4
5
6
7
8
9
10
11
12
13
14
15
16
17
18
19
20
21
22
23
24
25
26
27
28
29
30
31
32
33
34
<html lang="en" xmlns:th="http://www.thymeleaf.org">
<head>
<meta charset="UTF-8">
<title>更新数据</title>
<link rel="stylesheet" th:href="@{/static/css/index_work.css}">
</head>
<body>
<tr>
<th>id</th>
<th>lastName</th>
<th>email</th>
<th>gender</th>
</tr>
<tr>
<td th:text="${emp.id}"></td>
<td th:text="${emp.name}"></td>
<td th:text="${emp.email}"></td>
<td th:text="${emp.gender}"></td>
</tr>
<hr>
<form th:action="@{/employee}" method="post">
<input type="hidden" name="_method" value="put"><br>
<input type="hidden" name="id" th:value="${emp.id}"><br>
name:<input type="text" name="name" th:value="${emp.name}" ><br>
email:<input type="text" name="email" th:value="${emp.email}"><br>
gender:<input type="radio" name="gender" value="1">male
<input type="radio" name="gender" value="0">female<br>
<input type="submit" value="更新数据"><br>
</form>
</body>
</html>
删除:
每点击一次超链接,就要自动提交一次表单(用vue实现)
1
2
3
4
5
6
7
8
9
10
11
12
13
14
15
16
17
18
19
20
21
22
23
24
25
26
27
28
29
30<div id="app">
...
<td>
<a @click="deleteEmployee()" th:href="@{'/employee/'+${employee.id}}">delete</a>
<a th:href="@{'/employee/'+${employee.id}}">update</a>-->
</td>
...
</table>
<form method="post">
<input type="hidden" name="_method" value="delete">
</form>
</div>
<script type="text/javascript" th:src="@{/static/js/vue.js}"></script>
<script type="text/javascript">
var vue = new Vue({
methods:{
deleteEmployee(){
//获取form表单
var form = document.getElementsByTagName("form")[0];
//将超链接的href属性值赋值给form表单的action属性
form.action = event.target.href; //event.target表示当前触发事件的标签
//表单提交
form.submit();
//阻止超链接的默认行为
event.preventDefault();
}
}
});
</script>删除的控制器逻辑:
1
2
3
4
5
6
7// 删除数据
public String deleteIndex( Integer id) {
System.out.println(id);
empDao.delete(id);
return "redirect:/employee";
}
文件结构: