Redis(2)Jedis、Redis事务、Redis持久化操作
Jedis接口
Jedis的所有方法就是Linux操作redis的所有指令
pom.xml:
1
2
3
4
5
6
7
8
9
10
11
12
13<dependencies>
<dependency>
<groupId>redis.clients</groupId>
<artifactId>jedis</artifactId>
<version>3.2.0</version>
</dependency>
<dependency>
<groupId>junit</groupId>
<artifactId>junit</artifactId>
<version>4.12</version>
<scope>compile</scope>
</dependency>
</dependencies>连接:
1
2
3
4
import redis.clients.jedis.Jedis;
//...
Jedis jedis = new Jedis("127.0.0.1", 6379)String:
1
2
3
4
5
6
7
8
9
10
11
12
13
14
public void testString() {
jedis.set("name", "lucy");
String name = jedis.get("name");
System.out.println(name);
jedis.mset("k1", "v1", "k2", "v2");
List<String> mget = jedis.mget("k1", "k2");
System.out.println(mget);
Set<String> keys = jedis.keys("*");
for (String key : keys) {
System.out.println(key);
}
}List:
1
2
3
4
public void testList() {
jedis.lpush("key1", "lucy", "jack", "mary");
List<String> values = jedis.lrange("key1", 0, -1);
}Set:
1
2
3
4
public void testSet() {
jedis.sadd("names", "lucy", "mary");
Set<String> names = jedis.smembers("names");
}Hash:
1
2
3
4
5
6
7
public void testHash() {
Map<String, String> map = new HashMap<>();
map.put("age", "18");
map.put("name", "jack");
jedis.hmset("users", map);
String hget = jedis.hget("users", "age");
}Zset:
1
2
3
4
5
6
7
public void testZset() {
Map<String, Double> map = new HashMap<>();
map.put("shanghai", 100d);
map.put("beijing", 10d);
jedis.zadd("china", map);
Set<String> china = jedis.zrange("china", 0, -1);
}
redis与spring boot
pom.xml引入redis相关依赖
1
2
3
4
5
6
7
8
9
10
11
12
13
14
15
16
17
18
19
20
21
22
23
24
25<dependencies>
<dependency>
<groupId>org.springframework.boot</groupId>
<artifactId>spring-boot-starter-web</artifactId>
</dependency>
<dependency>
<groupId>org.springframework.boot</groupId>
<artifactId>spring-boot-starter-test</artifactId>
<scope>test</scope>
</dependency>
<!-- redis -->
<dependency>
<groupId>org.springframework.boot</groupId>
<artifactId>spring-boot-starter-data-redis</artifactId>
</dependency>
<!-- spring2.X集成redis所需common-pool2-->
<dependency>
<groupId>org.apache.commons</groupId>
<artifactId>commons-pool2</artifactId>
<version>2.6.0</version>
</dependency>
</dependencies>application.properties配置redis
1
2
3
4
5
6
7
8
9
10
11
12
13
14
15
16
#Redis服务器地址
=192.168.44.168
#Redis服务器连接端口
=6379
#Redis数据库索引(默认为0)
= 0
#连接超时时间(毫秒)
=1800000
#连接池最大连接数(使用负值表示没有限制)
=20
#最大阻塞等待时间(负数表示没限制)
=-1
#连接池中的最大空闲连接
=5
#连接池中的最小空闲连接
=0添加redis配置类RedisConfig(config文件夹下)
1
2
3
4
5
6
7
8
9
10
11
12
13
14
15
16
17
18
19
20
21
22
23
24
25
26
27
28
29
30
31
32
33
34
35
36
37
38
39
40
41
42
43
44
45
46
47
48
49
50
51
52
53
54
55
56
57
58
59
60
61
62
import com.fasterxml.jackson.annotation.JsonAutoDetect;
import com.fasterxml.jackson.annotation.PropertyAccessor;
import com.fasterxml.jackson.databind.ObjectMapper;
import org.springframework.cache.CacheManager;
import org.springframework.cache.annotation.CachingConfigurerSupport;
import org.springframework.cache.annotation.EnableCaching;
import org.springframework.context.annotation.Bean;
import org.springframework.context.annotation.Configuration;
import org.springframework.data.redis.cache.RedisCacheConfiguration;
import org.springframework.data.redis.cache.RedisCacheManager;
import org.springframework.data.redis.connection.RedisConnectionFactory;
import org.springframework.data.redis.core.RedisTemplate;
import org.springframework.data.redis.serializer.Jackson2JsonRedisSerializer;
import org.springframework.data.redis.serializer.RedisSerializationContext;
import org.springframework.data.redis.serializer.RedisSerializer;
import org.springframework.data.redis.serializer.StringRedisSerializer;
import java.time.Duration;
public class RedisConfig extends CachingConfigurerSupport {
public RedisTemplate<String, Object> redisTemplate(RedisConnectionFactory factory) {
RedisTemplate<String, Object> template = new RedisTemplate<>();
RedisSerializer<String> redisSerializer = new StringRedisSerializer();
Jackson2JsonRedisSerializer jackson2JsonRedisSerializer = new Jackson2JsonRedisSerializer(Object.class);
ObjectMapper om = new ObjectMapper();
om.setVisibility(PropertyAccessor.ALL, JsonAutoDetect.Visibility.ANY);
om.enableDefaultTyping(ObjectMapper.DefaultTyping.NON_FINAL);
jackson2JsonRedisSerializer.setObjectMapper(om);
template.setConnectionFactory(factory);
//key序列化方式
template.setKeySerializer(redisSerializer);
//value序列化
template.setValueSerializer(jackson2JsonRedisSerializer);
//value hashmap序列化
template.setHashValueSerializer(jackson2JsonRedisSerializer);
return template;
}
public CacheManager cacheManager(RedisConnectionFactory factory) {
RedisSerializer<String> redisSerializer = new StringRedisSerializer();
Jackson2JsonRedisSerializer jackson2JsonRedisSerializer = new Jackson2JsonRedisSerializer(Object.class);
//解决查询缓存转换异常的问题
ObjectMapper om = new ObjectMapper();
om.setVisibility(PropertyAccessor.ALL, JsonAutoDetect.Visibility.ANY);
om.enableDefaultTyping(ObjectMapper.DefaultTyping.NON_FINAL);
jackson2JsonRedisSerializer.setObjectMapper(om);
// 配置序列化(解决乱码的问题),过期时间600秒
RedisCacheConfiguration config = RedisCacheConfiguration.defaultCacheConfig()
.entryTtl(Duration.ofSeconds(600)) .serializeKeysWith(RedisSerializationContext.SerializationPair.fromSerializer(redisSerializer))
.serializeValuesWith(RedisSerializationContext.SerializationPair.fromSerializer(jackson2JsonRedisSerializer))
.disableCachingNullValues();
RedisCacheManager cacheManager = RedisCacheManager.builder(factory)
.cacheDefaults(config)
.build();
return cacheManager;
}
}
redis6事务(秒杀案例)
事务
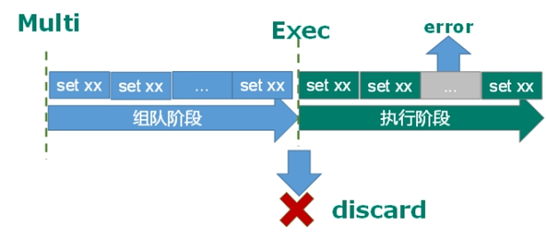
Redis事务是一个单独的隔离操作:事务中的所有命令被序列化,按顺序地执行。事务在执行的过程中,不会被其他客户端发送来的命令请求所打断——串联多个命令防止别的命令插队
从输入Multi命令开始,输入的命令会依次进入命令队列中,但不会执行,直到输入Exec后,Redis将之前的命令队列中的命令依次执行;组队中可以通过discard来放弃组队
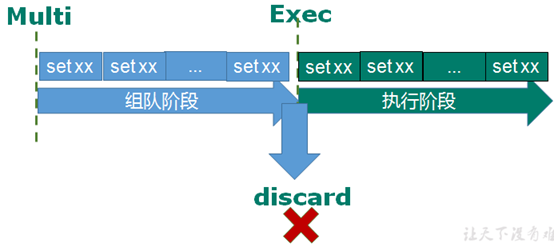
1
2
3
4
multi
set k2 v2
set k3 v3
exec错误处理:
组队中某个命令出现了报告错误,执行时整个的所有队列被取消
如果执行阶段某个命令报出了错误,则只有报错的命令不被执行,其他的命令正常执行
Redis事务三特性
- 单独的隔离操作:事务中所有命令序列化、按顺序地执行,执行的过程中不被其他客户端发送来的命令请求打断
- 没有隔离级别的概念 :命令没有提交之前都不会被执行
- 不保证原子性:如果有一条命令执行失败,其后的命令仍然会被执行
事务冲突
举例:三个请求,分别想减去金额8000、5000、1000
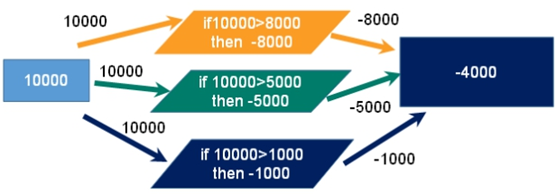
悲观锁:每次拿数据时都认为别人会修改,因此拿数据时都会上锁,下一个线程想获取这个数据时就会阻塞——在做操作之前先上锁
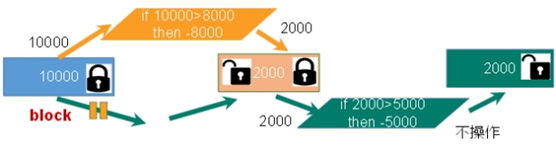
乐观锁:每次拿数据时都认为别人不会修改,因此不会上锁,但在更新的时判断期间数据有没有被更新(使用版本号等机制),即操作一个内存位置V的值之前,判断是否等于预期的值A,等于则将位置V更新为新的值B,否则不做操作。乐观锁适用于多读的应用类型,提高吞吐量——Redis利用check-and-set机制实现事务
监视key:
- 执行multi之前,先执行
watch key1 [key2],监视一个或多个key。事务执行之前key被其他命令改动,则事务将被打断 - unwatch:取消watch命令对key的监视。执行watch之后,exec或discard先被执行,则不需要执行unwatch
- 执行multi之前,先执行
案例
秒杀活动:
redis操作(简化):
使用乐观锁,解决超卖问题
1
2
3
4
5
6
7
8
9
10
11
12
13
14
15
16
17
18
19
20
21
22
23
24
25
26
27
28
29
30
31
32
33
34
35
36
37
38
39
40
41
42
43
44
45
46
47
48
49
50
51
52
53
54
55
56
57
58
59
public static boolean doSecKill(String uid, String prodid) throws IOException {
//1 uid和prodid非空判断
if(uid == null || prodid == null) {
return false;
}
//2 连接redis
//Jedis jedis = new Jedis("192.168.44.168",6379);
//通过连接池得到jedis对象
JedisPool jedisPoolInstance = JedisPoolUtil.getJedisPoolInstance();
Jedis jedis = jedisPoolInstance.getResource();
//3 拼接key
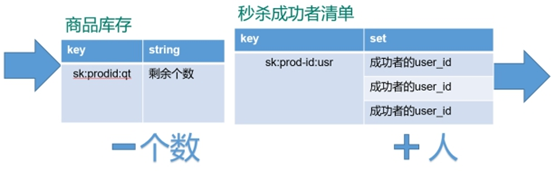
// 3.1 库存key
String kcKey = "sk:"+prodid+":qt";
// 3.2 秒杀成功用户key
String userKey = "sk:"+prodid+":user";
//监视库存
jedis.watch(kcKey);
//4 获取库存,如果库存null,秒杀还没有开始
String kc = jedis.get(kcKey);
if(kc == null) {
jedis.close();
return false;
}
// 5 判断用户是否重复秒杀操作
if(jedis.sismember(userKey, uid)) {
jedis.close();
return false;
}
//6 判断如果商品数量,库存数量小于1,秒杀结束
if(Integer.parseInt(kc)<=0) {
jedis.close();
return false;
}
//7 秒杀过程
//使用事务
Transaction multi = jedis.multi();
//组队操作
multi.decr(kcKey);
multi.sadd(userKey,uid);
//执行
List<Object> results = multi.exec();
//秒杀失败
if(results == null || results.size()==0) {
jedis.close();
return false;
}
jedis.close();
return true;
}使用连接池,防止用户连接超时:节省每次连接redis服务带来的消耗,把连接好的实例反复利用
MaxTotal:一个pool可分配多少个jedis实例,通过pool.getResource()来获取;如果赋值为-1,则表示不限制;如果pool已经分配了MaxTotal个jedis实例,则此时pool的状态为exhausted
maxIdle:控制一个pool最多有多少个状态为idle(空闲)的jedis实例;
MaxWaitMillis:表示当borrow一个jedis实例时,最大的等待毫秒数,如果超过等待时间,则抛JedisConnectionException;
1
2
3
4
5
6
7
8
9
10
11
12
13
14
15
16
17
18
19
20
21
22
23
24
25
26
27
28
29
30
31
32
33
34
35
import redis.clients.jedis.Jedis;
import redis.clients.jedis.JedisPool;
import redis.clients.jedis.JedisPoolConfig;
public class JedisPoolUtil {
private static volatile JedisPool jedisPool = null;
private JedisPoolUtil() {
}
public static JedisPool getJedisPoolInstance() {
if (null == jedisPool) {
synchronized (JedisPoolUtil.class) {
if (null == jedisPool) {
JedisPoolConfig poolConfig = new JedisPoolConfig();
poolConfig.setMaxTotal(200);
poolConfig.setMaxIdle(32);
poolConfig.setMaxWaitMillis(100*1000);
poolConfig.setBlockWhenExhausted(true);
poolConfig.setTestOnBorrow(true); // ping PONG
jedisPool = new JedisPool(poolConfig, "192.168.44.168", 6379, 60000);
}
}
}
return jedisPool;
}
public static void release(JedisPool jedisPool, Jedis jedis) {
if (null != jedis) {
jedisPool.returnResource(jedis);
}
}
}
库存遗留问题:500个商品由2000个人抢,但还剩下200个商品;乐观锁导致很多请求失败——使用lua脚本
将复杂的或者多步的redis操作,写为一个脚本,一次提交给redis执行,减少反复连接redis的次数
LUA脚本类似redis事务,有一定的原子性,不会被其他命令插队——多条redis命令需要捆绑在一起的原子性操作,最好都使用lua实现
1
2
3
4
5
6
7
8
9
10
11
12
13
14
15
16
local userid=KEYS[1];
local prodid=KEYS[2];
local qtkey="sk:"..prodid..":qt";
local usersKey="sk:"..prodid.":usr';
local userExists=redis.call("sismember",usersKey,userid);
if tonumber(userExists)==1 then
return 2;
end
local num= redis.call("get" ,qtkey);
if tonumber(num)<=0 then
return 0;
else
redis.call("decr",qtkey);
redis.call("sadd",usersKey,userid);
end
return 1;java调用脚本
1
2
3
4
5
6
7
8
9
10
11
12
13
14
15
16
17
18
19
20
21
22
23
24
25
26
27
28
29
30
31
32
33
34
35
36
37
38
39
40
41
42
43
44
45
46
47
48
49
50
51
52
53
54
55
56
57
58
59
60
61
62
63
64
65
66
67
import org.apache.commons.pool2.impl.GenericObjectPoolConfig;
import org.slf4j.LoggerFactory;
import ch.qos.logback.core.joran.conditional.ElseAction;
import redis.clients.jedis.HostAndPort;
import redis.clients.jedis.Jedis;
import redis.clients.jedis.JedisCluster;
import redis.clients.jedis.JedisPool;
import redis.clients.jedis.JedisPoolConfig;
import redis.clients.jedis.ShardedJedisPool;
import redis.clients.jedis.Transaction;
public class SecKill_redisByScript {
private static final org.slf4j.Logger logger =LoggerFactory.getLogger(SecKill_redisByScript.class) ;
public static void main(String[] args) {
JedisPool jedispool = JedisPoolUtil.getJedisPoolInstance();
Jedis jedis=jedispool.getResource();
System.out.println(jedis.ping());
Set<HostAndPort> set=new HashSet<HostAndPort>();
// doSecKill("201","sk:0101");
}
static String secKillScript ="local userid=KEYS[1];\r\n" +
"local prodid=KEYS[2];\r\n" +
"local qtkey='sk:'..prodid..\":qt\";\r\n" +
"local usersKey='sk:'..prodid..\":usr\";\r\n" +
"local userExists=redis.call(\"sismember\",usersKey,userid);\r\n" +
"if tonumber(userExists)==1 then \r\n" +
" return 2;\r\n" +
"end\r\n" +
"local num= redis.call(\"get\" ,qtkey);\r\n" +
"if tonumber(num)<=0 then \r\n" +
" return 0;\r\n" +
"else \r\n" +
" redis.call(\"decr\",qtkey);\r\n" +
" redis.call(\"sadd\",usersKey,userid);\r\n" +
"end\r\n" +
"return 1" ;
public static boolean doSecKill(String uid,String prodid) throws IOException {
JedisPool jedispool = JedisPoolUtil.getJedisPoolInstance();
Jedis jedis = jedispool.getResource();
String sha1 = jedis.scriptLoad(secKillScript);
Object result = jedis.evalsha(sha1, 2, uid, prodid); //根据给定的 sha1 校验码,执行缓存在服务器中的脚本;2: numkeys,指定键名参数的个数
String reString = String.valueOf(result);
if ("0".equals( reString ) ) {
System.err.println("已抢空!!");
}else if("1".equals( reString ) ) {
System.out.println("抢购成功!!!!");
}else if("2".equals( reString ) ) {
System.err.println("该用户已抢过!!");
}else{
System.err.println("抢购异常!!");
}
jedis.close();
return true;
}
}
redis持久化
RDB(Redis DataBase)
在指定的时间间隔内,将内存中的数据集snapshot写入磁盘,恢复时读取snapshot到内存
进行大规模数据的恢复,且对于数据恢复的完整性不敏感,RDB比AOF高效
备份:
单独创建(fork)一个子进程来持久化,先将数据写入一个临时文件,待持久化过程结束,用临时文件替换上次持久化的文件,此过程中主进程不进行任何IO操作——临时文件的使用,可以避免同步过程中服务器挂掉带来的影响,保证数据完整性,即为写时复制技术
fork:复制一个与当前进程相同的进程,新进程的所有数据(变量、环境变量、程序计数器等上下文)和原进程一致,作为原进程的子进程。一般父进程和子进程共用同一段物理内存,只有进程空间的内容要发生变化时,才将父进程的内容复制一份给子进程
流程:
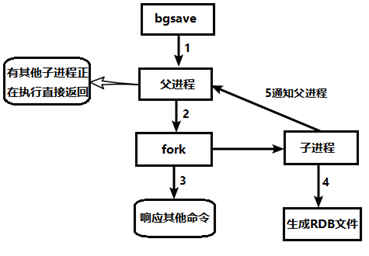
dump.rdb文件:默认的快照文件名,可在redis.conf中配置文件名。保存路径默认为Redis启动时命令行所在的目录,可在redis.conf中修改
恢复:将dump.rdb放到工作目录下, 启动redis后备份数据会直接加载
默认的快照配置:(snapshot部分)
保存的规则:900s后有1个key发生变化,就保存;300s后有10个key发生变化,就保存;60s后有10000个key变化,就保存
1
2
3
save 900 1
save 300 10
save 60 10000压缩:压缩磁盘中的快照(LZF算法),会消耗CPU
1
rdbcompression yes
完整性:使用CRC64算法来进行数据校验,增加10%的性能消耗
1
rdbchecksum yes
命令:
- save:只保存,其他线程全部阻塞
- bgsave:redis在后台异步进行snapshot,同时可以响应客户端请求
- lastsave:获得最后一个成功执行snapshot的时间
- config get dir:查询rdb文件的目录
- redis-cli config set save “”:动态地禁用保存策略
优缺点:
优势:
适合大规模的数据恢复
对数据完整性和一致性要求不高更适合使用
节省磁盘空间
恢复速度快
劣势:
最后一次持久化后的修改数据可能丢失
Fork时,内存中的数据被克隆了一份,需要考虑2倍的数据膨胀
Redis在fork时使用写时拷贝技术,但如果数据庞大还是比较消耗性能,可能导致redis在一些毫秒级不能响应客户端
AOF(Append Only File)
以日志形式记录每个写操作(增量保存),redis启动之初读取该文件重新构建数据
备份:
- 客户端的写命令被append到AOF缓冲区
AOF缓冲区根据conf中AOF持久化策略[always,everysec,no],将操作同步到磁盘的AOF文件
- AOF文件大小超过重写策略或手动重写时,对AOF文件rewrite重写,压缩AOF文件容量
redis服务重启时,加载AOF文件中的写操作恢复数据
默认不开启——在redis.conf中配置文件名称
appendfilename,默认为appendonly.aof,文件保存路径同RDB的路径,如果AOF和RDB同时开启,默认取AOF的数据恢复:
- 正常恢复
- 修改默认的appendonly no为yes
- 将AOF文件复制到config get dir
- 重启redis后自动加载
- 异常恢复
- 如遇到AOF文件损坏,需要调用
/usr/local/bin/redis-check-aof --fix appendonly.aof恢复 - 备份AOF文件,重启redis后重新加载
- 如遇到AOF文件损坏,需要调用
- 正常恢复
AOF持久化策略:
- appendfsync always:始终同步,每次Redis的写入都会立刻append到日志
- appendfsync everysec:每秒同步,每秒记入日志一次,如果宕机,本秒的数据可能丢失
- appendfsync no:redis不主动进行同步,同步时机交给操作系统
rewrite压缩
追加文件会越来越大,当AOF文件的大小超过设定的阈值时,Redis会启动AOF文件的内容压缩, 只保留可以恢复数据的最小指令集(主动压缩:命令
bgrewriteaof)——例如,set a b1、set b b1合并为set a a1 b b1rewrite原理:
fork新进程将文件重写——先写临时文件最后再rename,redis4.0后的重写会把rdb的快照以二级制的形式附在新的aof头部,作为已有的历史数据,替换原来的写操作
conf中的no-appendfsync-on-rewrite:为yes,则不写入aof文件只写入缓存,用户请求不会阻塞,但是在这段时间如果宕机会丢失这段时间的缓存数据。(降低数据安全性,提高性能)
如果 no-appendfsync-on-rewrite=no, 还是会把数据往磁盘里刷,但是遇到重写操作,可能会发生阻塞。(数据安全,但是性能降低)
触发机制
- Redis记录上次rewrite时的AOF文件大小,默认配置中,当前AOF文件大小是上次rewrite后大小的两倍、大于64M时再次rewrite——例如,文件达到70MB开始重写,降到50MB,下次100MB时重写
- AOF_size >= base_size +base_size*100%(默认)且AOF_size >=64mb(默认)
- conf:auto-aof-rewrite-percentage,设置重写的基准值,文件达到100%时开始重写(文件是上次rewrite结果的2倍时触发)
- conf:auto-aof-rewrite-min-size,设置重写的基准值,最小文件64MB
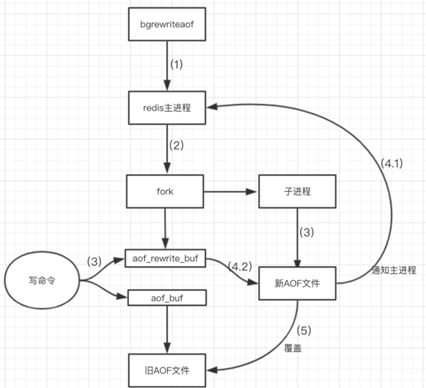
rewrite流程:
- bgrewriteaof触发重写,首先判断当前是否有bgsave或bgrewriteaof运行,如果有,则等待该命令结束后再继续执行
- 主进程fork出子进程执行重写操作,保证主进程不会阻塞
- 子进程将redis内存数据写入临时文件,客户端的写请求写入aof_buf缓冲区和aof_rewrite_buf重写缓冲区,保证原AOF文件完整以及新AOF文件生成期间新的数据修改动作不会丢失
- 子进程写完临时文件,向主进程发信号,主进程更新统计信息。主进程把aof_rewrite_buf的数据写入临时文件
- 新的AOF文件覆盖旧的AOF文件,完成AOF重写
- 优缺点:
- 优点
- 备份机制更稳健,丢失数据概率更低
- 可读的日志文本,可以处理误操作
- 缺点
- 占用更多的磁盘空间
- 恢复备份速度慢
- 如果每次读写都同步,有一定的性能压力
- 存在个别Bug使得无法恢复
- 优点
- 不建议单独用AOF,可能日志出错;如果只是做纯内存缓存,可以都不用;建议只在Slave上持久化RDB文件,只保留save 900 1规则